Driving & Getting a License

This page was written using the information on license conversion from the Tokushima Prefectural Police Website as well as first-hand accounts from Tokushima JETs.

Before you start driving in Japan, be sure to familiarize yourself with the local traffic laws and new signs as things may be a little different than what you are used to. Traffic travels on the left here, there is no turning at a red light, etc. Please be sure to familiarize yourself with Japanese road signs as they can differ greatly to other countries.

If you are coming to Japan, please be sure to come with an International Driver’s Permit (IDP) and your license from your home country. With an IDP, you are cleared to drive in Japan for a period of one year from your date of arrival or its date of issue, whichever is first, from most nations with such an agreement with Japan. Please check for your situation. At the end of this period, you will need to have your license translated, and in some cases take the written and practical Japanese driver’s test.

Getting a License

If you’ve been driving in Japan on an International Driver’s Permit (IDP), it is valid for a period of one year from your date of arrival or its date of issue, whichever is first.  At the end of that period, you will need to have your license converted into a Japanese license (外国免許証切り替え gaikoku menkyosho kirikae), and in some cases take the written and practical Japanese driver’s test.

It is suggested that you start the conversion process about 3 months before your IDP expires, as appointments must be made at each step–if you fail, you need time to make an appointment for a retest. If you wait until you have under a month left, there is a very good chance you will be without the ability to drive a car for a few weeks/months. 

Furthermore, even if you aren’t planning to own or drive a car upon arrival, but you have a license and you want to eventually convert, it’s recommended that you make your appointment as soon as you come to Tokushima with your supervisor and set the date for your appointment for around three months before your IDP is set to expire. Because the department that deals with foreign license conversion is very small in Tokushima, appointments can be difficult to acquire one to three months before your IDP is set to expire (if you brought one). Typically as of 2025, if you attempt to make an appointment around the time you arrive, the center may not have space for an appointment until about four months out of your IDP expiry date, leaving little time for retakes.

To summarize: You should make an appointment soon after you arrive in Tokushima, but set the appointment date for within 3-4 months of your IDP expiring.

If you are from a nation that honors reciprocal agreements of driver’s licenses with Japan, you will only need to take the Eye Exam and your license will be translated.  Those countries are:

Iceland, Ireland, United Kingdom, Italy, Austria, Australia, the Netherlands, Canada, South Korea, Greece, Switzerland, Sweden, Spain, Slovenia, Czechia, Denmark, Germany, New Zealand, Norway, Finland, France, Belgium, Poland, Portugal, Monaco, Luxembourg, Taiwan, and select states in the United States (Colorado, Hawaii, Maryland, Ohio, Oregon, Virginia, and Washington State)

However, if your country lacks such an agreement, the process is much harder and more involved, as you will have to take both a written and a road test in order to convert your license.

The Process

The rough outline of the conversion process is as outlined below.

Regardless of what country you are from, the process is the same though to the end of STEP THREE.  The content of the second appointment (STEP FOUR) then differs depending on whether Japan has a reciprocal agreement with your home country, as discussed in the section above.

Overview

  • Eligibility Requirements
  • STEPS
    • STEP ONE: Assembling the Necessary Documentation
      • Getting a JAF Official Translation
      • Getting to Your Appointments – Maps and Directions
    • STEP TWO: Schedule Your First Appointment with the License Center
    • STEP THREE: The First Appointment (Paperwork Submission)
      • OPTIONAL STEP: Attending a Practice Lesson
    • STEP FOUR: The Test Appointment
  • APPENDIX
    • APPENDIX A: Detailed Foreign License Conversion Practical Test Notes For the Three Testing Course
    • APPENDIX B: Important Links
    • APPENDIX C: Japanese/English Glossary of Selected Terms

Eligibility Requirements

  •    Already possess a valid foreign driver’s license
  •    Have received and used said license for at least three months in that country
  •    Necessary Documents (all original items, not copies)

STEP ONE

Assembling the Necessary Documentation

Before you can even make any appointments with the license center, you need the following items in your possession:

  • All items must be originals; copies will NOT be accepted.  They will not keep originals of things like your passport or residency card, but must see the originals and make their own copies to keep.
  • Your Passport
    • Including any older passports you have in your possession.  This is especially important if you have renewed your passport since coming to Japan.
  • Residency Certificate (住民票 juuminhyou)  
    • You can get this at your local city office branch for a small fee.  Make sure that the certificate lists your home country/nationality, as the driver’s license office will not accept it if it does not list it.  Take a look at it yourself and be sure you can point out where it shows that information if the clerk doesn’t see it.  They may reject it if they don’t see the country/nationality, but if you know it’s on there make sure to point it out if they aren’t finding it.  If you’re from the United States, be aware that the certificate may say 米国 (beikoku) rather than アメリカ (amerika).
  • Residence Card (在留カード zairyuu kaado)
  • Your License from your home country
    • You must have acquired your license in your home country for more than 3 months before moving to Japan.  If you did not, you are not eligible to directly transfer your license (ie, this process), and you must go through the full process of getting a Japanese license.
    • IMPORTANT: If you have been licensed for more than 3 months in your home country, you may need extra documentation. This may be especially true if your license has been renewed and DOES NOT list the ORIGINAL date of acquisition.  Many licenses from the United States only list the renewal date. In this case it’s also helpful to retrieve a driving license record or personal driving history from your state’s DMV if you do not have copies of your previous licenses. These documents usually detail any changes in your license as well any or the lack of accidents.
  • License Translation
  • This document must come from a governmentally-recognized source, NOT simply something you or your JTE translates.  The place to do this in Tokushima would be JAF.  As of 2024, you have to have your license be translated online. Typically, the request will be fulfilled within 2-5 business days.  See “JAF License Translation” below for details. The other options are in person or via mail.
  • 1 Japanese passport-style photo
    • 3 cm × 2.4 cm, encompassing the upper third of your body, no hat or other facial obstructions, plain background. Passport photo booths can be found outside of multiple stores in Tokushima. There is also a photo booth within the license center itself, but it advised to only rely on this one as a last resort.

**ONLY if your license needs support (as listed in Item 4 above)**

  • Driving History
    • Contact the driving license body of your home country/state and request a copy of your driving history or another document that shows how long you have been driving (must be longer than 3 months).  This will support your application in terms of your eligibility. I also was able to get away with showing them a picture of my old license since I had it lying around at home, so it might not hurt to ask a family member to look for that.
  • Documents surrounding the time you originally acquired your license
    • Many JETs have reported requiring further documentation that they were living in their home country for at least 3 months or sometimes even up to a year after receiving their initial license. 
      • Things such as college transcripts, insurance records, and employment records may be sufficient for this. In general, it is recommended to gather as many official documents as you can that could provide evidence of this, and just present them all in the hopes that it is sufficient.

JAF License Translation

Getting your license translated by JAF is a fairly easy process.  AS OF MARCH 31st, 2025, you must apply through the online application which can then be printed at a convenience store.

If you are reading this guide out of order, please note that a JAF License Translation is merely a sub-step in assembling the necessary documents for foreign license CONVERSION with the prefectural driver’s license center.  The JAF Translation alone will not allow you to drive in Japan legally. 

The information below is from the JAF website, adapted slightly.

Necessary Documents

Application form for Japanese Translation of foreign driver’s license:

AS OF MARCH 31st, 2025 you can no longer apply in person or via mail. You must apply online.

  • Your home country driver’s license
    • A fukuye is only required for licenses issued by the People’s Republic of China.  An Official Receipt is only required for licenses issued by the Republic of the Philippines.
  • A photocopy of a residence card or a resident record etc.
    • This is only required for licenses written in Arabic or Russian and licenses issued in certain countries, including the Republic of Korea, the Kingdom of Thailand, and the Union of Myanmar.

Translation Fees

Issuance fee – 4,000 yen per license

Please note that JAF will not refund the translation issuance fee even if your application for conversion is rejected by the Driver’s License Center.  A fee of 4,000 yen is also charged for re-issuance when the license translation is lost, etc..

Turnaround Time

Typically 2-5 days

Other important notices

  • JAF does not offer translation services for International Driving Permits.
  • A JAF License Translation is merely a sub-step in assembling the necessary documents for foreign license CONVERSION with the prefectural driver’s license center. The JAF Translation alone will not allow you to drive in Japan legally.
  • See the JAF website for more information.

Getting to your appointments

Depending on your placement, you might have help getting to your appointment. Some JETs report their supervisors helped drive them there. Some had to travel on their own. Some JETs were able to report the time they used to for their appointments as a business trip (出張) other were required to take vacation days (年休) and had to arrange for various friends to take them back and forth. You should ask your school/BOE if they’ll help you, but don’t be completely surprised if they won’t.

If your IDP is already expired, make sure you go by bus or get a ride there.  You shouldn’t be driving illegally in any case, but if they see that you’ve driven yourself you could get in big trouble… They are police, after all!  It seems self-explanatory but it’s happened before.

Note that appointment times for foreign license conversion at the Driver’s License Center are always at 2PM, so depending how far away you live, you’ll be forced to take more vacation time to get there.  Make sure you leave yourself enough time to get to your appointment!

Getting to the Tokushima Driver’s License Center

Available by train via transfer to bus or by car. There is a bus stop right at the driving center.

By Bus

There is a bus that goes directly to the Driver’s License center. As with other public transportation in Tokushima, times are infrequent, and depending on your placement it may not be convenient for you. Be sure to check bus and train times for any connections you need to make in order to get to your appointment on time.

For information on how to ride buses in Tokushima click here

Coming from Tokushima Station, you want the bus bound for “鳴門公園行” that goes via “老門・田ノ浦経由” The bus site doesn’t tell you where to board the bus or the bus number, but the people working in the booths are super helpful. Just tell them you’re going to the menkyo sentaa (免許センター) and they’ll tell you where to catch the bus.

Looking up service times: On the Tokushima Bus Website, choose the “バス時刻表検索(文字入力)” option, then enter “徳島駅前” (Tokushima Eki-Mae) as your departure stop (出発地) and “免許センター前” Menkyo Sentaa Mae) as your destination (目的地).

Another bus stop a very short walk from the License Center is 免許センター口.  It runs service slightly more often than the 免許センター前 stop.  This stop is about 5 minutes down the road across from Marunaka.

STEP TWO

Schedule Your First Appointment with the License Center using their number: 088-699-0110

Call the Driver’s License Center.  Make sure you have all necessary documents already gathered.  The number above is the general line; you will have to be transferred to the foreign license conversion department.

If possible, have a supervisor or other native Japanese speaker call to set up the appointment for you.  There have been stories from JETs with fairly conversational Japanese ability calling and being rudely told to have a native speaker call back.

When you call, they will ask which country you will be converting the license from. In some cases, when the reply was America, they further wanted to know which state. Then they will confirm that you acquired the necessary documents by going through the list. They usually will double check that the translation was from an official source (JAF is valid), and the proof of residence lists your nationality on it.

See “Step Three” for more information.

As stated before, depending on the time of year, the center will be more or less busy, so you may have to wait a few weeks or months before the next open appointment. Appointments are always set from 2PM on a weekday. They are not open on weekends or national holidays.

STEP THREE

The Paperwork Appointment

Before going to this appointment, you will want to do a bit of research/memory jogging relating to the process of getting your license in your home country. This portion of the process is often described as one of the most off-putting parts, as it can feel like a really aggressive cross-examination. Try to prepare answers to the information described below. It also helps to bring a native speaker with you if you can, even if your Japanese ability is pretty high, as some people have had unpleasant experiences with staff in regards to being told they had to bring a translator.

See “Getting to Your Appointments” in step one for directions to the license center.

When you arrive, go to the international license transfer window, which is on the second floor, station #21. The appointment will always be set from 2pm, but if you get there between 1:30-2 they might start early if they aren’t busy. 

They will check over your Necessary Documents and give you a form to fill out regarding your driving license history. It is translated somewhat badly into English, and at times it was easier to see what the question was really asking by reading the Japanese instead.

  • The Intake Sheet
    • Here is the information that you will want to know the answers to. Commit the answers to memory because they will ask you about it verbally later, and even though it may have been decades since you went through the process in your home country, they will expect you to know it; it looks bad if you can’t answer off the top of your head.
      • Note: when asked to write your name, always write it as it appears on your Residency Card with all capitals—LAST NAME  FIRST NAME  MIDDLE NAME
    • Date you acquired your first driver’s license:  Year / Month / Day
    • Where was it acquired:  Country, State
    • What kind of license?  Regular vehicle (futsuu 普通) / bus / motorcycle / etc
    • In your country, what is the legal age to get a driver’s license?
    • What type of license do you have?  (Automatic / Manual Transmission)
    • How many years have you had a license?
    • Since having it, have you renewed it at all?
    • Did you attend a driving school?
    • What is the name of the driving school?
    • How many months did you attend classes?
    • How many questions was the written test for your license?
    • What was the content of the practical test?
    • What kind of car did you use for the practical test?  (Automatic/Manual)
    • You can answer somewhat generally, but try to be thorough.  For example, for the “content of the practical test”, don’t just put “how to drive a car.”  Put things like “correct response to road signs like ‘stop,’ ‘yield,’ and speed limit signs; various types of parking; use of signal lights; changing lanes; right of way” etc. etc.
    • Turn the form back in and settle in to wait for them to call you back into the meeting room for the paperwork review.  This review is the portion that you want to really know your answers to and be confident about. It’s a lot of stuff that is probably from so long ago that you can’t remember, so do a little bit of research through your own paperwork, your memories, and good old Google.
  • Passport Check
    • First, they will go through your passport and ask about all the dates that correspond with visa stamps in it so make sure to remember the dates of your trips and when you entered and left. 
      • Please make sure that your passport has the exit and entrance stamps. If you are missing exit and/or entrance stamps, they will question why. You should prepare to answer that you didn’t receive one. 
      • It seems bizarre and not pertinent, but it ended up being tangentially related to the next point:
    1.  
  • Licensing History
    • Even though much of the information is on the form you’ve already just turned in, they will ask about your licensing history in your home state, from the year you were first licensed, to asking for all the years the card was renewed, leading all the way up to the current license.  They are using the information from this and the passport visa questions above to make sure that you were using your license for at least 3 months consecutively before moving to Japan (a bit overkill, but whatever).
      • If your home country driver’s license doesn’t show an issue date that is more than 3 months before you moved abroad, you will need to turn in your supporting documentation as discussed in the “Necessary Documents section” above.
    1.  
  • Home Country License Process Timeline
    • Basically, how did you go from being a car-less teen to your full-license-wielding self? How old were you, what were the rules and laws and hoops your country/state wanted you to jump through? It may be helpful to look up your state’s DMV or DPS and memorize the rules for how driver’s licenses are given.  You can then recite it for them, and reading through it might actually jog your memory.
      • Example (TX, USA): “I started back when I was 15, entering drivers ed (gotta say the name of the company/school), took classroom lessons for 2 months wherein we learned rules of the road, as well as driving safety, basic car maintenance, and basic driving theory. Then I took a learner’s permit test. There were 20 questions on the test. The learner’s permit meant that I could drive a car with an instructor or parent in the passenger seat, for the purpose of learning to drive. I was not allowed any other passengers. I had to log my hours of in-car practice as part of my driver’s ed school requirements. At 16, I took a provisional license test. It was a written test of 50 questions and a practical, in-car exam. The written test covered rules of the road and driving theory. The practical test covered driving skills like recognizing road signs, parking, switching lanes, turning, etc. When I passed, I was granted the provisional license.  Provisional License meant I could only have one non-family member passenger in the car. I couldn’t drive after 9PM. At 18, my license was upgraded to an “under-21” license. I could take more passengers and drive after 9PM.  At 21, my license was a full license.”
    • In the case you didn’t attend driving school make sure to detail the rules for your state regarding driving on a learner’s permit without enrolling at a driving school as well as how you practiced driving for your exam.
      • For example (NY), “I studied for a written exam with about 50 questions. You must score at least 80% to move on to getting your learner’s permit. Then, I practiced with a driver over the age of 25 for 50 hours, 30 during the day and 20 at night. After I completed my driving log hours, I scheduled a driving test. In New York, driving tests are on the road so I did the practical exam demonstrating ability to turn left and right, parallel, forwards, and backwards parking, understanding of signs and signals, yielding for pedestrians, and proper driving ettiquette such as hand positioning, seat positioning, mirror placement and use, examining damages or issues with the car, and signal and windshield wiper usage. Then I passed the test and was given my license at 17 with an upgrade to the adult license at 21.”
    1.  
  • Japan Driving Experience
    • They will ask a few more questions about any driving experience you have in Japan; if you’ve been driving on an IDP, if you’ve been pulled over, if you’ve had an accident, etc.  Driving experience in-country is a plus for your application, and small infractions on your IDP don’t preclude you from switching your license.
    1.  
  • Set an appointment for the follow-up testing
    • At this point they will allow you to set an appointment for any testing you have to do (dependent on your home country).  They will not allow you to do it the same day as your paperwork appointment; there must be at least about a week waiting period in between.  If you need to confer with your supervisor about it before you commit, they will allow you to call back to make the 2nd appointment.
  1.  

Citizens of nations with a reciprocal agreement:

If you are from a nation that honors reciprocal agreements of driver’s licenses with Japan, during your second appointment you will only need to take the Eye Exam and your license will be translated.  Those countries are:  Iceland, Ireland, United Kingdom, Italy, Austria, Australia, Holland, Canada, Korea, Greece, Switzerland, Sweden, Spain, Czech Republic, Denmark, Germany, New Zealand, Norway, Finland, France, Belgium, Portugal, Luxembourg, Taiwan, and select states in America (Colorado, Hawaii, Maryland, Ohio, Oregon, Virginia, and Washington State).

You can skip the OPTIONAL STEP below and go to STEP FOUR.

Citizens of nations without a reciprocal agreement:

If your country is not one of the ones listed above, the process for the second appointment is much harder and more involved, as you will have to take both a written and a road test in order to convert your license.

It is recommended you read the OPTIONAL STEP below to get information on how the course will go.

OPTIONAL STEP

Attending a Practice Lesson

If you are from a country that has a reciprocal agreement with Japan regarding license conversion, you do NOT have to take a practical exam on your second visit, so you can skip this step altogether.

If you are from a country that does NOT have a reciprocal agreement with Japan regarding license conversion, you WILL have to take a practical test during your second appointment. You have probably been driving for a long time, but the test is not like actual driving at all and is more just proving that you can take the test.

They will NOT allow you to do a practice lap on the actual test day, nor will they drive the course for you. They will only explain what you have to do verbally, BEFORE you are even on the road. You are expected to memorize the course, and during the test they won’t say a single thing about what you need to do.

Scheduling a lesson with a practice instructor is highly recommended. Please refer to other members of the JET community for contact information for driving instructors. Currently the instructor most JETs use for practice only has a automatic instructors vehicle for use. As the instructor is likely to be a non-English speaker, it is recommended to have a JTE help you with placing the call. If the contact info provided is a cell phone number, it is likely that you may have to try calling more than once, as voice mails are not common in Japan.

One recommendation we have for a driver instructor is Shidao Hiroaki (090-8979-5085). He only speaks Japanese, but he is a great driving instructor and was gracious enough to allow us to publish his number here for anyone who may need it. His prices are ~¥7,000 for one hour of practice, ¥14,000 for 2 hours.

Scheduling a practice lesson with a driving instructor can really help improve your chance of passing on the day. As of April 2026, the driving course for foreign conversion is now three different potential courses. One is picked at random on the testing day.

Please note you cannot schedule a practice lesson until you have a test appointment (2nd appointment) set with the Driver’s License Center. The instructor has to file paperwork to get approval to use the course with you from the Center, and the Center will reject the paperwork if you are not scheduled for the test yet. It is recommended to contact the driving instructor as soon as possible after scheduling the test appointment, as busy seasons may make it difficult to schedule a lesson on short notice.

FeesTypically about 7000 yen for 1 hour of practice

VenuePractices at the license center, on the actual course

SchedulingPractice lessons are from 1 pm on Monday-Friday, Saturday*

*During peak seasons, you HAVE to schedule during the week. To schedule Saturday practice, you have to let them know the Friday before you want to come, before 1 pm.

They will meet you at the License Center and will explain the course, drive it once for you, then you drive it and get feedback. An hour seems like a long time, but you will only get to run the course a few times, and before you realize it, your hour is over.

For more information on the Course, see “Appendix A” and the Course maps.

STEP FOUR

The Test Appointment

For countries with a reciprocal license agreement with Japan:  At this point, you simply need to show up for your Eye Exam and pass (with or without glasses) and your license will be given a Japanese equivalent. This will still be separate from the paperwork appointment, so a total of two appointments (one to turn in documents, and another for the test) are required.

For all others: Since you are an international driver, and you already have your license, they will give you a full 50 question test on testing day.

The current test is written in English, and consists of 50 multiple choice questions about signs and detailed rules of the road in Japan. You will be able to review most of these things by Googling “Japanese Driver’s Test” and trying the online practice exams. It is very important to study for this written test as the questions are often detailed and sometimes phrased where only one point about subject matter is changed such as the amount of distance or time. Furthermore, you must score a 90% to be allowed to take the driving exam. If you fail, you will have to reschedule your appointment.

For your practical test, you will be tested using either an Automatic by default unless you have specified that you are taking the manual exam. If you want to drive manual, please be sure to inform the driving center as it is marked on Japanese licenses. If you don’t receive the manual marking, you won’t be able to drive manual.

As with the other appointments, slots are only available from 2 pm.

Necessary materials for the second appointment

(This list was compiled as necessary documents for someone from a NON-AGREEMENT country.  If you are from a country with a reciprocal agreement, please confirm which fees, etc. apply to you.)

  • ID sized photograph (edit: as of 2019 you should turn this photo in during your first appointment).
  • Not passport-sized. It must be 3 x 2.4cm. If you can’t get to a photo booth beforehand, they have some on the ground floor of the license center for 700 yen. You get two pictures from the booth, but they only need one.
    • This picture is used to file your test application, it will not be used for your actual ID card. They take a different picture for that after you pass.
  • Test Fee: 2250 yen
  • License Fee (if you pass): 2050 yen
  • Make sure to bring your glasses or contacts if you need them
  • Shoes: make sure you are wearing functional shoes like trainers or walking/running shoes.  They will not let you do the practical test in sandals, heels, etc.

The Process

  • Check in at station #21 (second floor) at 2:00 pm. There you will fill out your personal information on the form. Please write your name in all capital letters in the order on your residence card.
  • Turn it back in to station #21 to be checked over, once you receive it back, they will ask you to go to the window downstairs to receive the test fee stamps showing you paid. These are usually windows one or two on the left most side.
  • Pay the 2250 yen test fee and get stamps on the form to show you paid. Go back upstairs and turn the stamped form in to window #21.
  • Next, Wait until you’re called for the vision test. If you’re wearing corrective lenses, they’ll test you without them on and then with them on. This is to determine whether or not you get a restriction on your license to wear corrective lenses while driving.
    • Japanese eye tests are different from others (at least from US eyesight tests). Rather than reading off letters to them, there are a series of circles with gaps in different placements. You will state which direction the gap in the circle is. Then they will test for colour blindness using red, yellow, and green. The test takes about two minutes, and they allow you to respond in English or Japanese.
  • After the eye exam, wait until you are called for the written test (ペーパーテスト“paper test”).  They will confirm which language for the test you prefer, then sit you in the conference room.
  • As stated, the test will be 50 multiple choice questions and you will have about an hour to complete it. The language on the paper will be completely one language so you won’t be able to double check your understanding of the translation. Be wary as some questions are worded a little weirdly.
  • After you complete it, they will grade it and return to let you know if you passed the written course and can advance to the practical course.
    • If you didn’t pass, you’ll have to reschedule and pay the testing fee once more.
  • Then they will take you to the course maps wall and show you which course you will be doing, it will be the foreign license conversion courses (外国免許切れ替え) either one, two, or three.
    • They will then give you 10 minutes to familiarize yourself with the course. BUT they will also inform you that if you follow the course map exactly you will be doing illegal maneuvers. This is because the course maps in the driving center do not show the lane changes you are required to do
      • Please make sure to review before your testing day the actual courses either through practice lessons or via our detailed driving course sections complete with detailed notes and updated maps!
  • They’ll tell you a time to meet them outside on the course starting bay.  Be sure to get there a few minutes early.
  • Don’t be surprised if two or more instructors both ride along with you. One or two will watch you from the back; one from the passenger seat. They won’t talk at all or give you any hints on what you’re doing, so you’ll be doing it all by memory.
  • Lastly, be aware that one, the airport is nearby. When planes take off, the course does rumble. Secondly, sometimes other drivers will be on the course with you. Do not worry about that and do the course as intended, treating them as any other car on the road.

The Course

For a complete breakdown of each course please view  “Appendix A”  and the Course Map section.

Completion

As mentioned in the practical test coverage, when you’re finished, they don’t tell you that you’ve passed right away, though it seems that if they tell you to “go back to the 2nd floor and wait for the score to be discussed” then you’ve most likely passed. They will eventually come out to tell you if you passed, then give you another form to take to the cashier. This fee will be to process your license.

If you have failed you will be made aware of it at the parking bay and sent back to reschedule your test. There is a short waiting period between your failed test and the retake.

Getting the License Made

Take the form to Station 1 or 2, first floor and pay the fee to get the form stamped. Bring it back upstairs or to whichever window they requested you take it to. Usually then you go back to the first floor in the back area where the picture stations are. You will typically take the photo first, please do not smile in the photo, and then wait afterwards as they fill out forms.

They will call you over to check and make sure that your name, address, etc. is correct on the card. This is also when they will inform you whether or not you need a beginner driver tag on your car. This is dependent on the testing score that they don’t show you so whether you need it or not will be stamped on the back of your card. Once you confirm the information is right, they will print the card. Be sure to absolutely make sure it’s correct otherwise you will have to pay to reprint it.

They will continue explaining your license, the different meanings, and what the colour strip means. Then once you confirm there are no errors, it becomes your official card.

Afterwards, they will then give you a speech about driving in Japan usually beginning with, “you have a Japanese license now, you can no longer use the excuse that because you are a foreigner you didn’t know the rules.” Then once that is complete, they will inform you of how you generally did and things to watch out for like if you drove a little fast on the test. Once all of that is said, you are free to leave with your license!

*If you do need to change the address on the card at any point, you can return to the driving center or you can usually update it at the police station.

Appendix A

Detailed Foreign License Conversion Practical Test Notes

For the Testing Course at the Tokushima Licensing Center, Updated April 2026

**Automatic Car**

General Notes

  • As a general disclaimer, this is not an official guide. The following are simply notes that an individual took when practicing and studying for the drivers test. Additionally, please be aware that the advice in these notes is specifically for how to drive during the drivers test at the Tokushima License Center as of April 2026, and may not apply universally to all situations/roads.
  • These notes are for the test for automatic cars. The manual car test may differ.
  • If you are used to driving in a country where you drive on the right side of the road and the driver seat is on the left side of the vehicle, be aware that in addition to the direction of traffic changing, your turn signal and windshield wipers flip positions too. In Japan, your turn signal is on the right side of the steering wheel, and windshield wipers are on the left.
  • When driving in the left lane your car should be positioned towards the left side of the lane. A good way to check this is to align your body with the center of the road.
  • When you are preparing to make a right turn, or turning into the right lane of a two-lane road with plans to make a right turn shortly thereafter, your car should be positioned as close as you can safely be to the centerline of the road, aka the right side of the rightmost lane going in your same direction of traffic. 
  • When attempting to switch lanes, turn your signal on approx. 3 seconds before you execute the lane switch. It’s fine to count out loud for the test. Check the road (side mirror and look back to check blindspot) AFTER you’ve turned your signal on for this test. Make sure you are NOT pressing the accel pedal while you check behind you, and you are holding the wheel straight. I was told you will be docked 20 points if you accelerate or start to turn the wheel while you are still checking your side/blindspots.
  • When making a turn, turn your signal on approx. 30 meters before you make the turn.
  • Before turning or merging, ALWAYS check your blindspot behind you in the direction you are turning for bicycles, motorcycles, etc. If you get confused which direction to check, you should be checking the blindspot on the same side as your signal is indicating. This will be the final thing you do before making the actual turn. However, like with switching lanes, be careful not to accelerate while you are looking back to check your blindspot. 
  • Although it seems like a good thing to check the road multiple times each way to be safe before turning/merging, you will be docked points if you continue to check left and right after you’ve started moving/as you turn the wheel. When your car is moving forward, they want your eyes to be on the road ahead of you.
  • On the driver’s test, when making a turn onto a road with two-lanes in one direction, you should turn into the lane that will put you in position for the next turn you intend to take, unless there is plenty of time (more than 30 meters) to switch lanes later. For example, if you are making a right turn, but intend to turn left shortly after, you should turn into the left lane of the road. This is why it’s so important to memorize the courses ahead of time for the test. 
  • When stopped at a red light that subsequently turns green, check left and right before releasing the break, even when proceeding straight.
  • In general, they do not want you to use your brakes on a curve in the road. Instead, decelerate as much as you need (to about 20-25kph should be fine) on the straightaway before entering the curve of the road.
  • If you are approaching a stop sign, do not check right and left as you approach; only do your checks after stopping completely. For intersections without a stop sign, it’s fine and encouraged to check left and right early as you approach.
  • During my test, the proctor told me that up until the crosswalk is a “grace period” where they wouldn’t be grading yet. I can’t say for certain they do this every time, but know that there’s a possibility they will tell you that. It shouldn’t change anything about how you drive the course though.

Starting the Test

The test begins as you approach the car. 

  1. You will be approaching on the left side of the parked vehicle. First, you should walk to the front of the car (Approach from the left. Do not circle around the back side/to the right). Bend down to check under the vehicle for children, animals, etc. Obviously, there won’t be any, but your test practitioner will be looking to make sure you do this. (And yes, you need to fully bend down to where you can see under the vehicle.) 
  2. Next, return to the left side of the vehicle and bend down and check under the front, and then back, left tires. 
  3. Then, walk right to the rear of the vehicle and bend down and check there. 
  4. Next, you will be checking the right tires of the car; however, before you do so, you should check the road to the right and left to make sure there are no oncoming cars first. 
  5. Once you’ve made sure the coast is clear, approach the right side of the vehicle and check the back, and then front, right tires. Check the road behind you left and right once more before opening the car door and getting in.

Once you’ve entered the car on the driver’s side, you will need to perform more checks in the following order:

  1. First adjust your seat to make sure you can drive comfortably and safely. The lever should be on the bottom front of your seat. Place your hands on the wheel and foot on the brake pedal (you don’t need to actually press it yet) to ensure you will be comfortable when you actually start driving. 
  2. Rear view mirror check. Even if it is in the perfect position, still put your hands up to it, as your proctor will be looking to make sure you do.
  3. Side view mirror check. If you need to adjust the side mirror positionings, the controls to do so should be on the inside panel of the driver’s side door. 
  4. Fasten your seatbelt and check to make sure it is not tangled or twisted.
  5. Press the brake pedal and turn on the car’s engine (will likely be a key turn).
  6. Pressing the brake pedal, put the car in Drive. 
  7. Release the parking/e-brake on your left, making sure it is fully disengaged.
  8. Turn on your right turn signal.
  9. Perform a five-point check in the following order: right side view mirror, right blindspot (physically turn your body around to check the road to the back right), left side mirror, left blindspot, and lastly, your rearview mirror.
  10. If the coast is clear, pull away slowly and begin to drive.

If you are on mobile, please download the course images for better viewing.

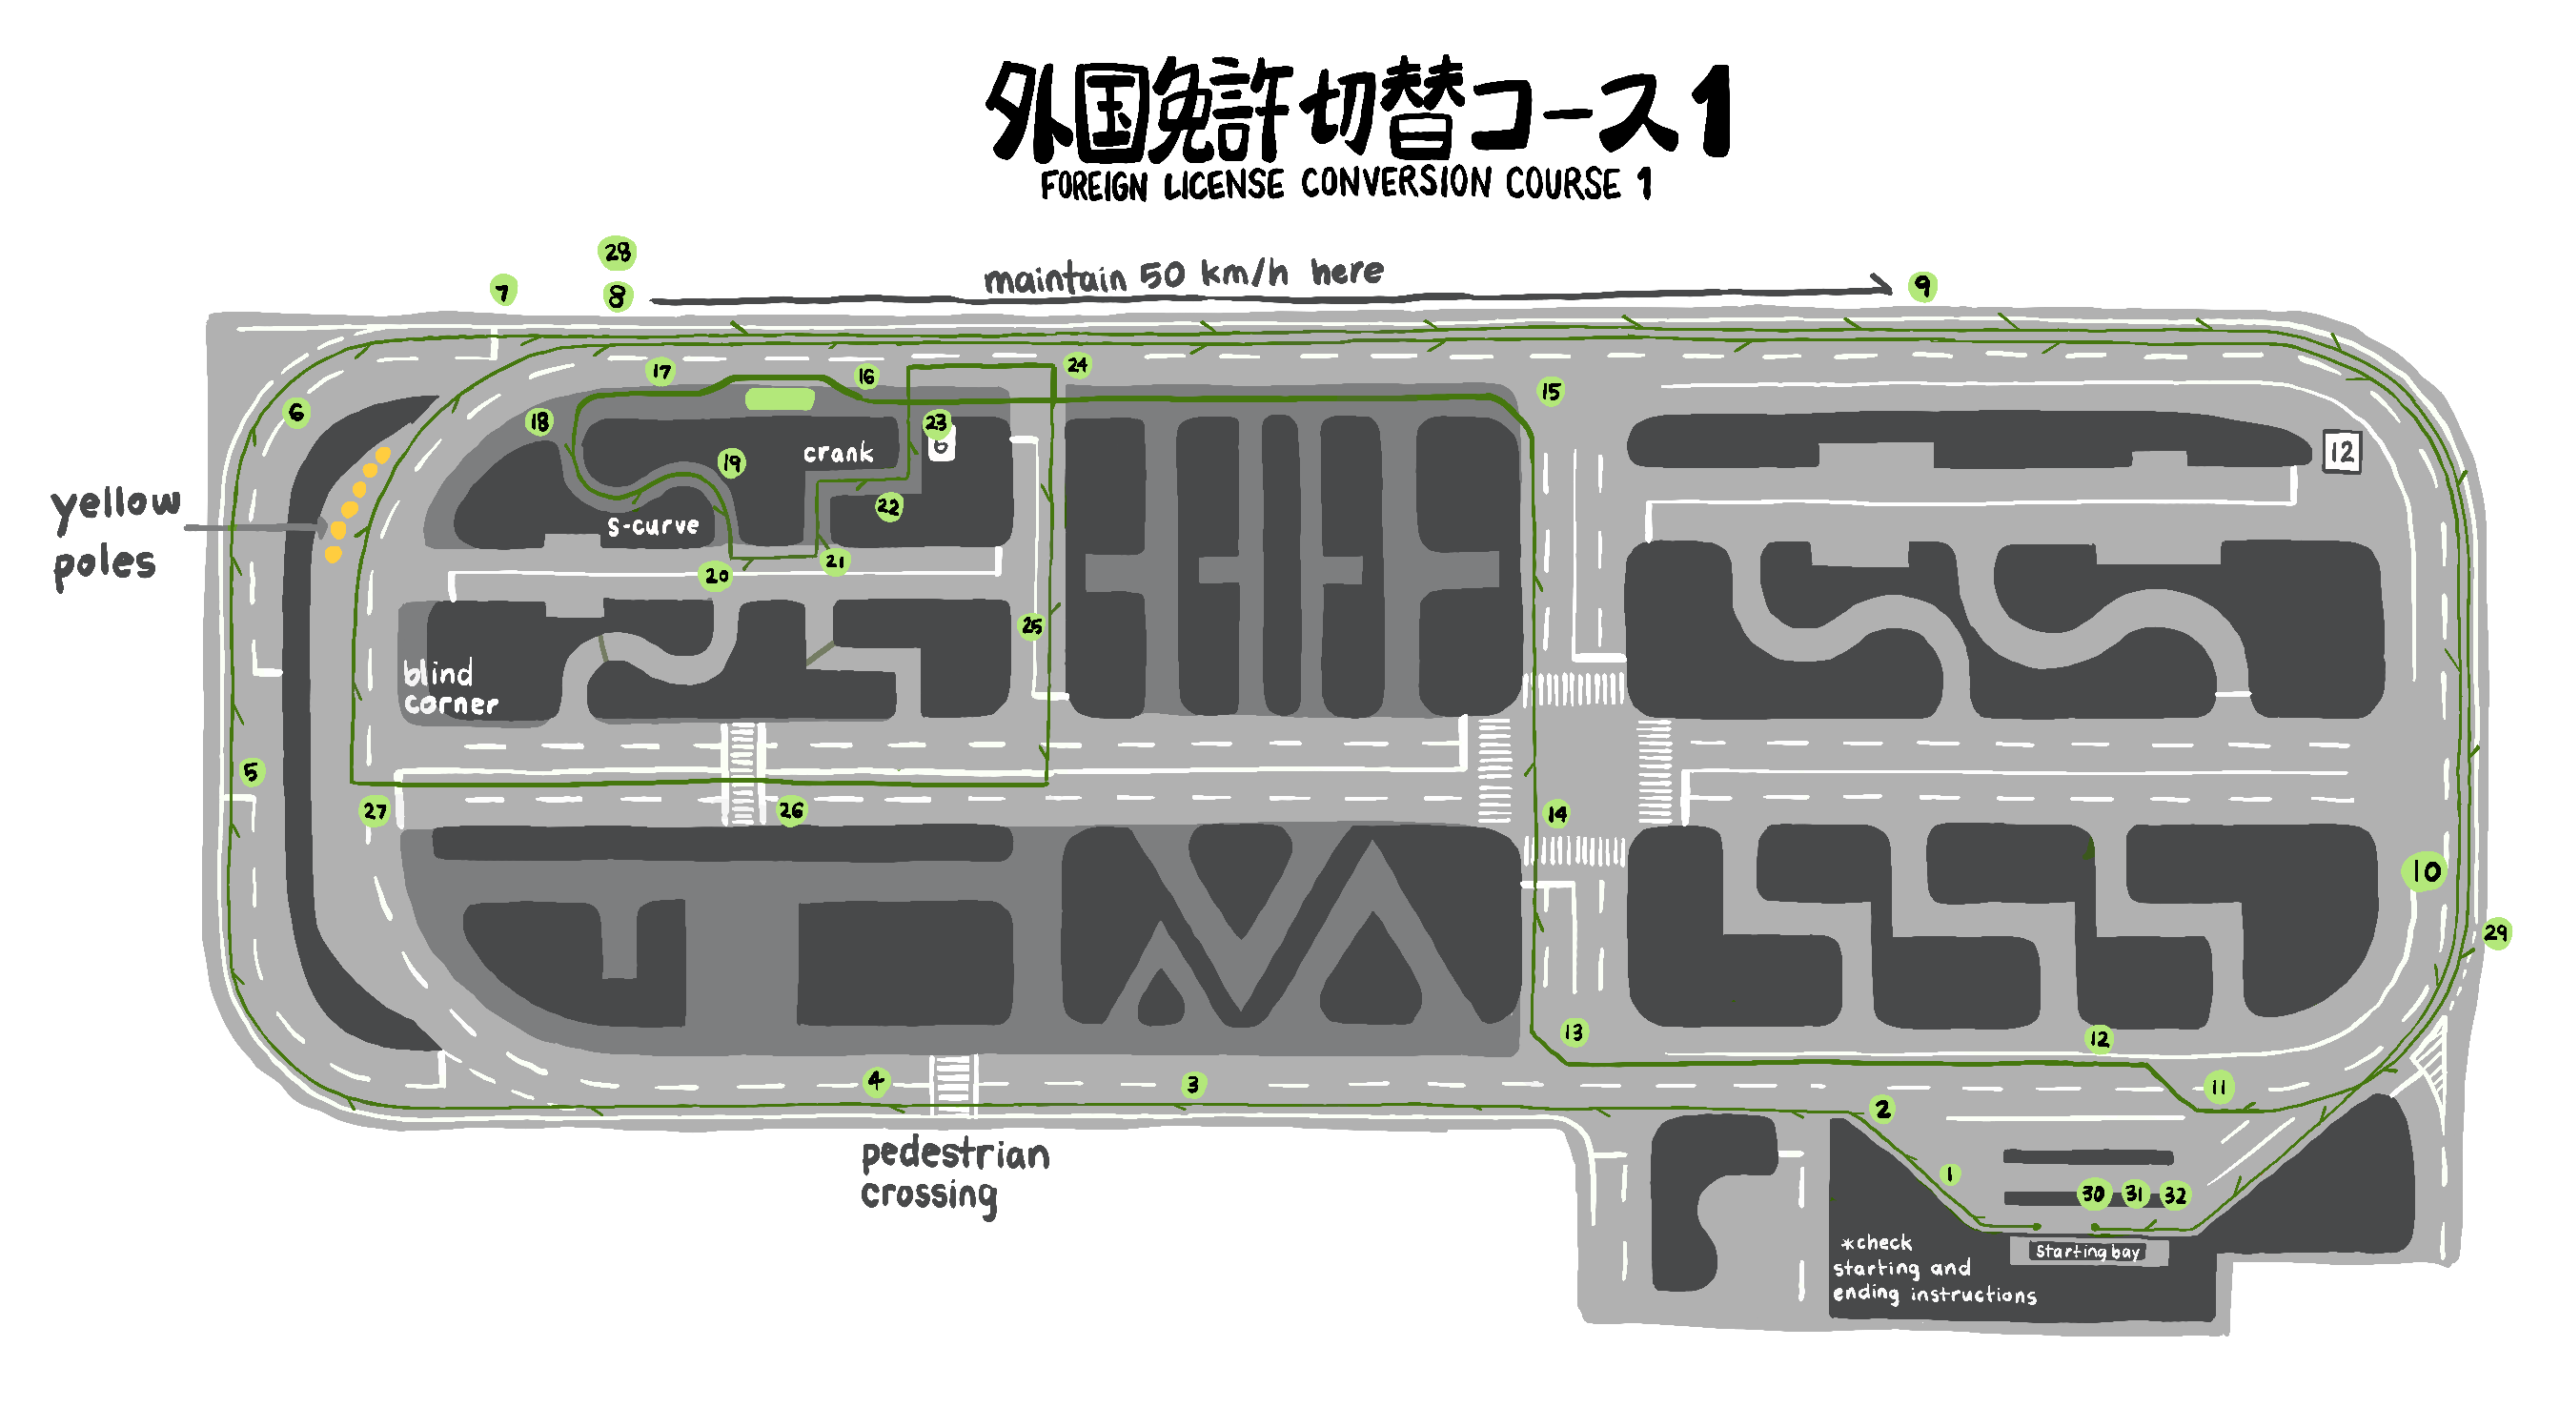
Course 1

It may help to think of Course 1 as divided into two distinct parts: the first big loop around the outside of the course, and the second part where you will traverse the inside of the course. 

  1. After you’ve pulled away from the starting point, immediately turn on your left signal. You will need to slow down and prepare to turn left to merge onto the course’s main road. 
  2. Check the road to your right and left, and check your back left for bicycles etc., then pull into the left lane of the road. Here, you can let your speed get up to around 30-35kph. 
  3. You will soon approach a crosswalk. Here, you do not need to slow down or stop, but make sure to visibly check left and right with enough time that you could stop if you needed to as you pass by. Do not step on the accel pedal as you do your check, but you’re fine to accelerate through the crosswalk once you have checked, if you need to.
  4. After passing through the crosswalk, immediately turn on your left signal, as you will soon branch off onto the outer loop road (also known as the portion of the course with the sloped road or 坂道 sakamichi). It’s important to turn on your left turn signal here even though you are simply proceeding straight because you are technically switching roads. Before branching off the road, check behind you to your left for bicycles. 
  5. Slow down significantly as you prepare to enter the curve approaching the hill. On the peak of the hill, there will be a line indicating where to stop. The steps you need to take here are:
    1. Stop at the line on the upwards slope (using the foot brake like normal)
    2. Engage your parking brake
    3. Release the foot brake
    4. Check right and left
    5. Release the parking brake while simultaneously pressing the accel pedal
    6. Once you have crested the hill’s peak, you should begin lightly pressing the foot brake as you descend to keep your descent at a controlled, slow speed. Do not completely release the foot brake until you have reached the bottom of the slope. 
  6. Once you have descended the hill, immediately turn on your left signal. (Again, this may be confusing to some, as you will not actually be turning left after this, but rather merging into another road.) Before you reach the end of the silver guard rail to your left, you should check the road to your left for oncoming traffic. There should be none, so proceed to follow the curve of the road until you reach the stop sign (止まれ). 
  7. Come to a full stop at the line. Your signal may have automatically turned itself off during this curve, so if it has, make sure to hit the left signal one more time. Here is also a good point to take a big deep breath if you need one. Only once you’ve come to a full stop should you check the road to your right, and do your bicycle check to your back left. Once you’ve done that, proceed forward (turning your signal off if it hasn’t automatically done so).
  8. The next portion of Course 1 is a long, straight piece of track, where you’re encouraged to let yourself get up to ~50kph (but not over 50, as it is the marked speed limit for this portion). 
  9. After proceeding for about 2/3 of the straight track, you will notice that the final 1/3 of the track is a slightly lighter color of concrete. You can use this as a marker for when to begin braking. What is important here is that the test proctors expect you to press the brake at least three distinct times, gradually slowing down each time. When you reach the curved corner of the track, you should be around 20kph, so you can loosely aim to slow down 10kph with each press of the brake. Proceed to follow the track along this corner, and then straight to approach the final corner of the first loop.
  10. Enter the final corner of the first loop around Course 1 at a relatively slow speed. (This is so you will have ample time to switch lanes once you straighten out.) You can think of this as the end of the first “half” or part 1 of Course 1.
  11. From here, you will begin the second portion of the course. You should currently be in the left lane of the road. As you pass in front of the starting point, turn your right signal on to prepare to switch into the right lane. Count three seconds, and then check your right side mirror and blindspot, swiftly switching to the right lane once you’re sure the coast is clear. When you enter the right lane, position the car on the right side of the lane, since you will be turning right shortly thereafter. 
  12. Once you have switched lanes, immediately turn on your right signal again (if it hasn’t turned itself off from switching lanes, you can just leave it on). Your next move will be a right turn onto the road with two lanes in each direction that leads to the intersection with the traffic signal (there is only one traffic signal on the course). 
  13. Slow down significantly as you approach the turn and check the intersecting roads to the left and right. Finally, just before you turn right, check behind you to your right for bicycles. Turn into the LEFT (outer) lane in front of the stoplight. (There is a small marking on the road here, but don’t worry, it’s fine to just drive over it and make your wide turn into the outer lane.)
  14. In Course 1, you will go straight through the intersection with the traffic light. If it is green when you approach, simply check right and left as you proceed. If it is red, stop at the line and wait until it turns green, upon which you should check right and left before releasing the foot brake. If the traffic light turns yellow as you approach, use your discretion. As you pass through the crosswalk on the far side of the intersection, turn on your left signal as you will be making the first left turn after the intersection.
  15. After you’ve passed through the intersection, you will turn left at the T turn ahead of you onto the smaller outer road (see Course 1 map for reference). Check for traffic to your left and right, as well as your left blind spot, and make your left turn. This road is one-lane and one-way only. 
  16. Proceed forward and you will eventually come upon a parked car on your left. As you approach the car, turn on your right signal (since you’re avoiding an obstacle here, there’s no need to wait 3 seconds). Check the road ahead of you for oncoming traffic as well as your right mirror and blindspot before moving to the right to avoid the parked car. You should aim to leave about 1m of space between you and the car, but do not go fully over the line; instead, aim to straddle it. You will want to be going relatively slow, but there’s no strict need to brake as you pass by the car. 
  17. When the parked car is aligned with your left, turn your left signal on and check your left blindspot for bicycles. Once you’ve passed the car, you should quickly return to the lane. 
  18. After you’ve passed the parked car, immediately turn on (or leave on) your left signal. Next, you will need to check your left blindspot once more before making a near immediate left turn at ⑥ into the S curve section. For this section, take it slow and make your turns wide. Entering the first curve wide will help set you up for success in the second half. 
  19. At the last curve, turn on your left signal to prepare in advance for your next turn. Check right and left here even before you’ve completely finished turning, they want you to check early. When you approach the exit of the S curve section, your goal is to be centered in the exit (if you return your steering wheel to straight too soon or too late after the last S curve, you will end up on the far-left or far-right side of the road at the exit). 
  20. Once you’ve finished the S curves, you will be performing two left turns in quick succession. Make sure your left signal is still on, and check right and left once again as well as your left blindspot before turning left. Next, immediately turn your left blinker back on and check your left blindspot again before taking the very next turn to your left: a sharp turn into the 90-degree angle (or crank) turn section
  21. For the crank turns, you should be aiming to align the curb of the side of the road closest to you with about where your knees are inside the car. You can and should go slowly through this section, although you shouldn’t be stopping completely at any point. If you accidentally ride up on the curb, calmly reverse and fix your course. I was told that reversing off a curb isn’t an immediate failure here, but hitting the “wall” of yellow poles is, so better safe than sorry. 
  22. Before your last crank turn, turn on your right signal in advance, and check left and right before you even come to a stop.
  23. After you’ve finished the crank section, check for traffic left and right once again, as well as your right blindspot, and turn into the right lane of the main two-lane road, NOT the small outer road with the parked car obstacle that you were on before. (See attached Course 1 map for reference). Once you’ve made this turn, turn on (or leave on) your right signal and prepare to make the next right turn.
  24. Check for traffic to your right, as well as your right blindspot, and turn right. You should now be on a straight road with a stop sign at the end of it. 
  25. As you approach the stop sign, turn on your right turn signal. After stopping at the stop sign, check right and left, as well as your right blindspot, before turning right into the right side of the RIGHT lane of the main road. 
  26. You will soon come across a railroad crossing. Here, you need to come to a full stop at the line marked on the road. While stopped, roll down your window a little bit and “listen” for sounds of any trains approaching as you check left and right. Then proceed through the railroad crossing, turning your right signal on immediately after you have passed through it. 
  27. Next, you will approach another T intersection, but this one will have tall blocks obstructing your view on the right corner. You will be turning right here. Slow down as you approach this intersection and creep forward, physically leaning forward in your seat to look left and right back and forth until you can see past the blocks. Complete one final check to the left, right, and finally, your right blindspot. You will be making a wide right turn into the LEFT lane of the road.
  28. From here, you will proceed along the road until you come across the long, straight stretch of road from section 1 where you should get up to 50kph. Follow the same process as before (50kph, breaking three times consecutively to lead into the corner curve at ~20-25kph.) 
  29. Next, on the last section of straight road before the starting gate, turn your left signal on (you did not use your left signal the first loop through, but since you will be pulling off the road into the starting area this time, you need to use it the second time around). Check the intersecting road to the left and your left blindspot quickly before pulling off into the starting zone, easing into the parking bay. 
  30. You should end with the car in between the black and yellow poles aiming less than 30cm between the car and the curb, and the car and the black and yellow poles in front.
  31. Put the car in park, engage the e-brake, and turn off the ignition.
  32. Finally, look out the driver’s side window and at the right side-view mirror to check for traffic left and right before opening your door. When you do open it, open it just a crack at first to warn “drivers” behind you, and pause before opening it fully. Get out, close the door behind you, and your test is complete. Great work!

Course 1 Turn Order: L (out of the starting gate), R, L, L (6), L, L, R, R, R, R (block), L (into starting gate)

Tips to Remember Course 1: 

  • Full loop FIRST
  • Lane change when passing back in front of starting gate
  • First turn is R into the L lane
  • Straight through traffic signal intersection
  • From the first turn after the traffic signal to after the 90-degree turns, ALL TURNS are L
  • From the end of 90-degree turns to the final return to starting gate, ALL TURNS are R
  • Course 1 has one lane switch
Course 2

  1. After you’ve pulled away from the starting point, immediately turn on your left signal. You will need to slow down and prepare to turn left to merge onto the course’s main road.
  2. Check the road to your right and left, and check your back left for bicycles etc., then pull into the left lane of the road. 
  3. Here, you can let your speed get up to around 30-35kph. 
  4. You will soon approach a crosswalk. Here, you do not need to slow down or stop, but make sure to visibly check left and right with enough time that you could stop if you needed to as you pass by. Do not step on the accel pedal as you do your check, but you’re fine to accelerate through the crosswalk once you have checked, if you need to. 
  5. After passing through the crosswalk, immediately turn on your right signal, wait three seconds, and check your right side mirror and blind spot before switching to the right lane, hugging the right side of it. Next, turn your right signal on again (or leave it on) as you prepare to turn. 
  6. Once you’ve rounded the first corner of the track, you will soon be making a RIGHT turn into the LEFT (far) lane of the central thoroughfare (the road leading to the intersection that has two lanes in each direction.) Check for traffic to the right and your right blindspot before making your turn. There will be tall blocks on the far corner of the road that you’ll be turning into, so use that as a marker for where to turn into (see attached Course 2 map for reference). 
  7. You will soon come across a railroad crossing. Here, you need to come to a full stop at the line marked on the road. While stopped, roll down your window a little bit and “listen” for sounds of any trains approaching as you check left and right. Then proceed through the railroad crossing, turning your left signal on immediately after you have passed through it. 
  8. After the railroad crossing, you will be taking the second left turn. Check your left blindspot before turning. The road you turn into will have only one lane in each direction, and a stop sign at each end. Once you’ve straightened the wheel, turn your left signal on once more. 
  9. At the end of this road, you will approach a stop sign (止まれ). Your left blinker should already be on, so after fully stopping at the line, check right, left, and your left blindspot before making a sharp turn to the left. The road you will turn onto is a one-lane, one-way road.
  10. Next, you will need to avoid the parked car on the left side of the road. As you approach the car, turn your right signal on (since you’re avoiding an obstacle here, there’s no need to wait 3 seconds). Check the road ahead of you for oncoming traffic as well as your right mirror and blindspot before moving to the right to avoid the parked car. You should aim to leave about 1m of space between you and the car, but do NOT go fully over the line; instead, aim to straddle it. You will want to be going relatively slow, but there’s no strict need to brake as you pass by the car. 
  11. When the parked car is aligned with your left, turn your left signal on and check your left blindspot for bicycles. Once you’ve passed the car, you should quickly return to the lane
  12. After you’ve passed the parked car, immediately turn on (or leave on) your left signal. Next, you will need to check your left blindspot once more before making a near immediate left turn at ⑥ into the S curve section. For this section, take it slow and make your turns wide. Entering the first curve wide will help set you up for success in the second half. 
  13. At the last curve, turn on your left signal to prepare in advance for your next turn. Check right and left here even before you’ve completely finished turning, they want you to check early. When you approach the exit of the S curve section, your goal is to be centered in the exit (if you return your steering wheel to straight too soon or too late after the last S curve, you will end up on the far-left or far-right side of the road at the exit). 
  14. Once you’ve finished the S curves, you will be performing two left turns in quick succession. Make sure your left signal is still on, and check right and left once again as well as your left blindspot before turning left. 
  15. Next, immediately turn your left blinker back on and check your left blindspot again before taking the very next turn to your left: a sharp turn into the 90-degree angle (or crank) turn section
  16. For the crank turns, you should be aiming to align the curb of road closest to you with about where your knees are inside the car**. You can and should go slowly through this section, although you shouldn’t be stopping completely at any point. If you accidentally ride up on the curb, calmly reverse and fix your course. I was told that reversing off a curb isn’t an immediate failure here, but hitting the “wall” of yellow poles is, so better safe than sorry. 
  17. Before your last crank turn, turn on your right signal in advance, and check left and right before you even come to a stop.
  18. After you’ve finished the crank section, check for traffic left and right once again, as well as your right blindspot, and turn into the right lane of the main two-lane road, NOT the small outer road with the parked car obstacle that you were on before. (See attached Course 2 map for reference). 
  19. Once you’ve made this turn, turn on (or leave on) your right signal and prepare to make the next right turn. Check for traffic to your right, as well as your right blindspot, and turn right. You should now be back on the straight road with a stop sign at the end of it. As you approach the stop sign, turn on your left turn signal. After stopping at the stop sign, check right and left, as well as your left blindspot, before turning left into the LEFT lane of the main central thoroughfare. 
  20. In Course 2, you will go straight through the intersection with the traffic light. If it is green when you approach, simply check right and left as you proceed. If it is red, stop at the line and wait until it turns green, upon which you should check right and left BEFORE releasing the foot brake. If the traffic light turns yellow as you approach, use your discretion. 
  21. After passing through the intersection, you will need to switch to the right lane. Quickly turn your right signal on, wait three seconds, and check your right mirror and right blindspot before switching lanes. You will want to position yourself in the right side of the right lane, as you will be making a right turn next. 
  22. Once you’ve switched lanes, either keep on or turn on your right signal once more. Next, you will approach a T intersection with tall blocks obstructing your view to the left and right. You will be turning right here. Slow down to a crawl as you approach this intersection and creep forward, physically leaning forward in your seat to look left and right back and forth, until you can see past the blocks. Making sure your right signal is still on, complete your checks to the right, left, and finally, right blindspot. Make a wide right turn into the LEFT lane of the road, positioning your body in the center of the lane.
  23. Next you will round the curve before circling back around in front of the starting gate area. You can think of this as the end of “part one” of Course 2. The second “half” of Course 2 is a full loop around the outer track. You will stay in the left lane the entire time. As you pass back in front of the starting gate, let your speed get up to around 30-35kph. 
  24. You will soon approach a crosswalk. Here, you do not need to slow down or stop, but make sure to visually check left and right with enough time that you could stop if you needed to as you pass by. 
  25. After passing through the crosswalk, immediately turn on your left signal, as you will soon branch off onto the outer loop road (also known as the portion of the course with the sloped road or 坂道 sakamichi). It’s important to turn on your left turn signal here even though you are simply proceeding straight because you are technically switching roads. Just before branching off the road, check behind you to your left for bicycles. 
  26. Slow down significantly as you enter the curve approaching the hill. On the peak of the hill, there will be a line indicating where to stop. The steps you need to take here are, in order:
    1. Stop at the line on the upwards slope (using the foot brake like normal)
    2. Engage your parking brake
    3. Release the foot brake
    4. Check right and left
    5. Release the parking brake while simultaneously pressing the accel pedal
    6. Once you have crested the hill’s peak, you should begin lightly pressing the foot brake as you descend to keep your descent at a controlled, slow speed. Do not completely release the foot brake until you have reached the bottom of the slope. 
  27. Once you have descended the hill, immediately turn on your left signal. (Again, this may be confusing to some, as you will not actually be turning left after this, but rather merging into another road.) Before you reach the end of the silver guard rail to your left, you should check the road to your left for oncoming traffic. There should be none, so proceed to follow the curve of the road until you reach the stop sign (止まれ). Come to a full stop at the line. Your signal may have automatically turned itself off during this curve, so if it has, make sure to hit the left signal one more time. Here is also a good point to take a big deep breath if you need one. Only once you’ve come to a full stop should you check the road to your right, and do your bicycle check to your back left. Once you’ve done that, proceed forward (turning your signal off if it hasn’t automatically done so.
  28. The next portion of Course 2 is a long, straight piece of track, where you need to get your speed up to about 50kph (do not go over 50, as it is the marked speed limit for this portion).
  29.  After proceeding for about 2/3 of the straight track, you will notice that the final 1/3 of the track is a slightly lighter color of concrete. You can use this as a marker for when to begin braking. What is important here is that the test proctors expect you to press the brake at least three distinct times, gradually slowing down each time. When you reach the curved corner of the track, you should be around 20kph, so you can loosely aim to slow down 10kph with each press of the brake. Proceed to follow the track along this corner, and then straight to approach the final corner of the loop.
  30. As you approach the final corner of the loop, turn your left signal on (you did not use your left signal the first time you passed by here, but since you will be pulling off the road into the starting area this time, you need to use it the second time around). Check your side left and back left blindspot quickly before pulling off into the starting zone, easing into the parking bay. You should end with the car in between the black and yellow poles with less than 30cm between the car and the curb, and the car and the black and yellow poles in front. 
  31. Put the car in park, engage the e-brake, and turn off the ignition.
  32. Finally, look out the driver’s side window and at the right side-view mirror to check for traffic left and right before opening your door. When you do open it, open it just a crack at first to warn “drivers” behind you, and pause before opening it fully. Close the door behind you, and your test is complete. Great work!

Course 2 Turn Order: L (out of starting gate), R, L, L (stop sign), L (⑥), L (out of S), L (into crank), R (out of crank), R, L (stop sign), R (block), L (into starting gate)

Tips to Remember Course 2

  • Course 2 is the only course with the difficult stuff first and the full loop last
  • Switch lanes after the first crosswalk
  • The first turn is right into left lane (use singular block as marker)
  • Take the second L after RR x-ing onto road w/ stop sign
  • S/crank directions/turns etc. same as Course 1
  • Turn left at stop sign
  • Go straight through the intersection w traffic light
  • Turn right at blocks T-intersection
  • Course 2 has two lane switches
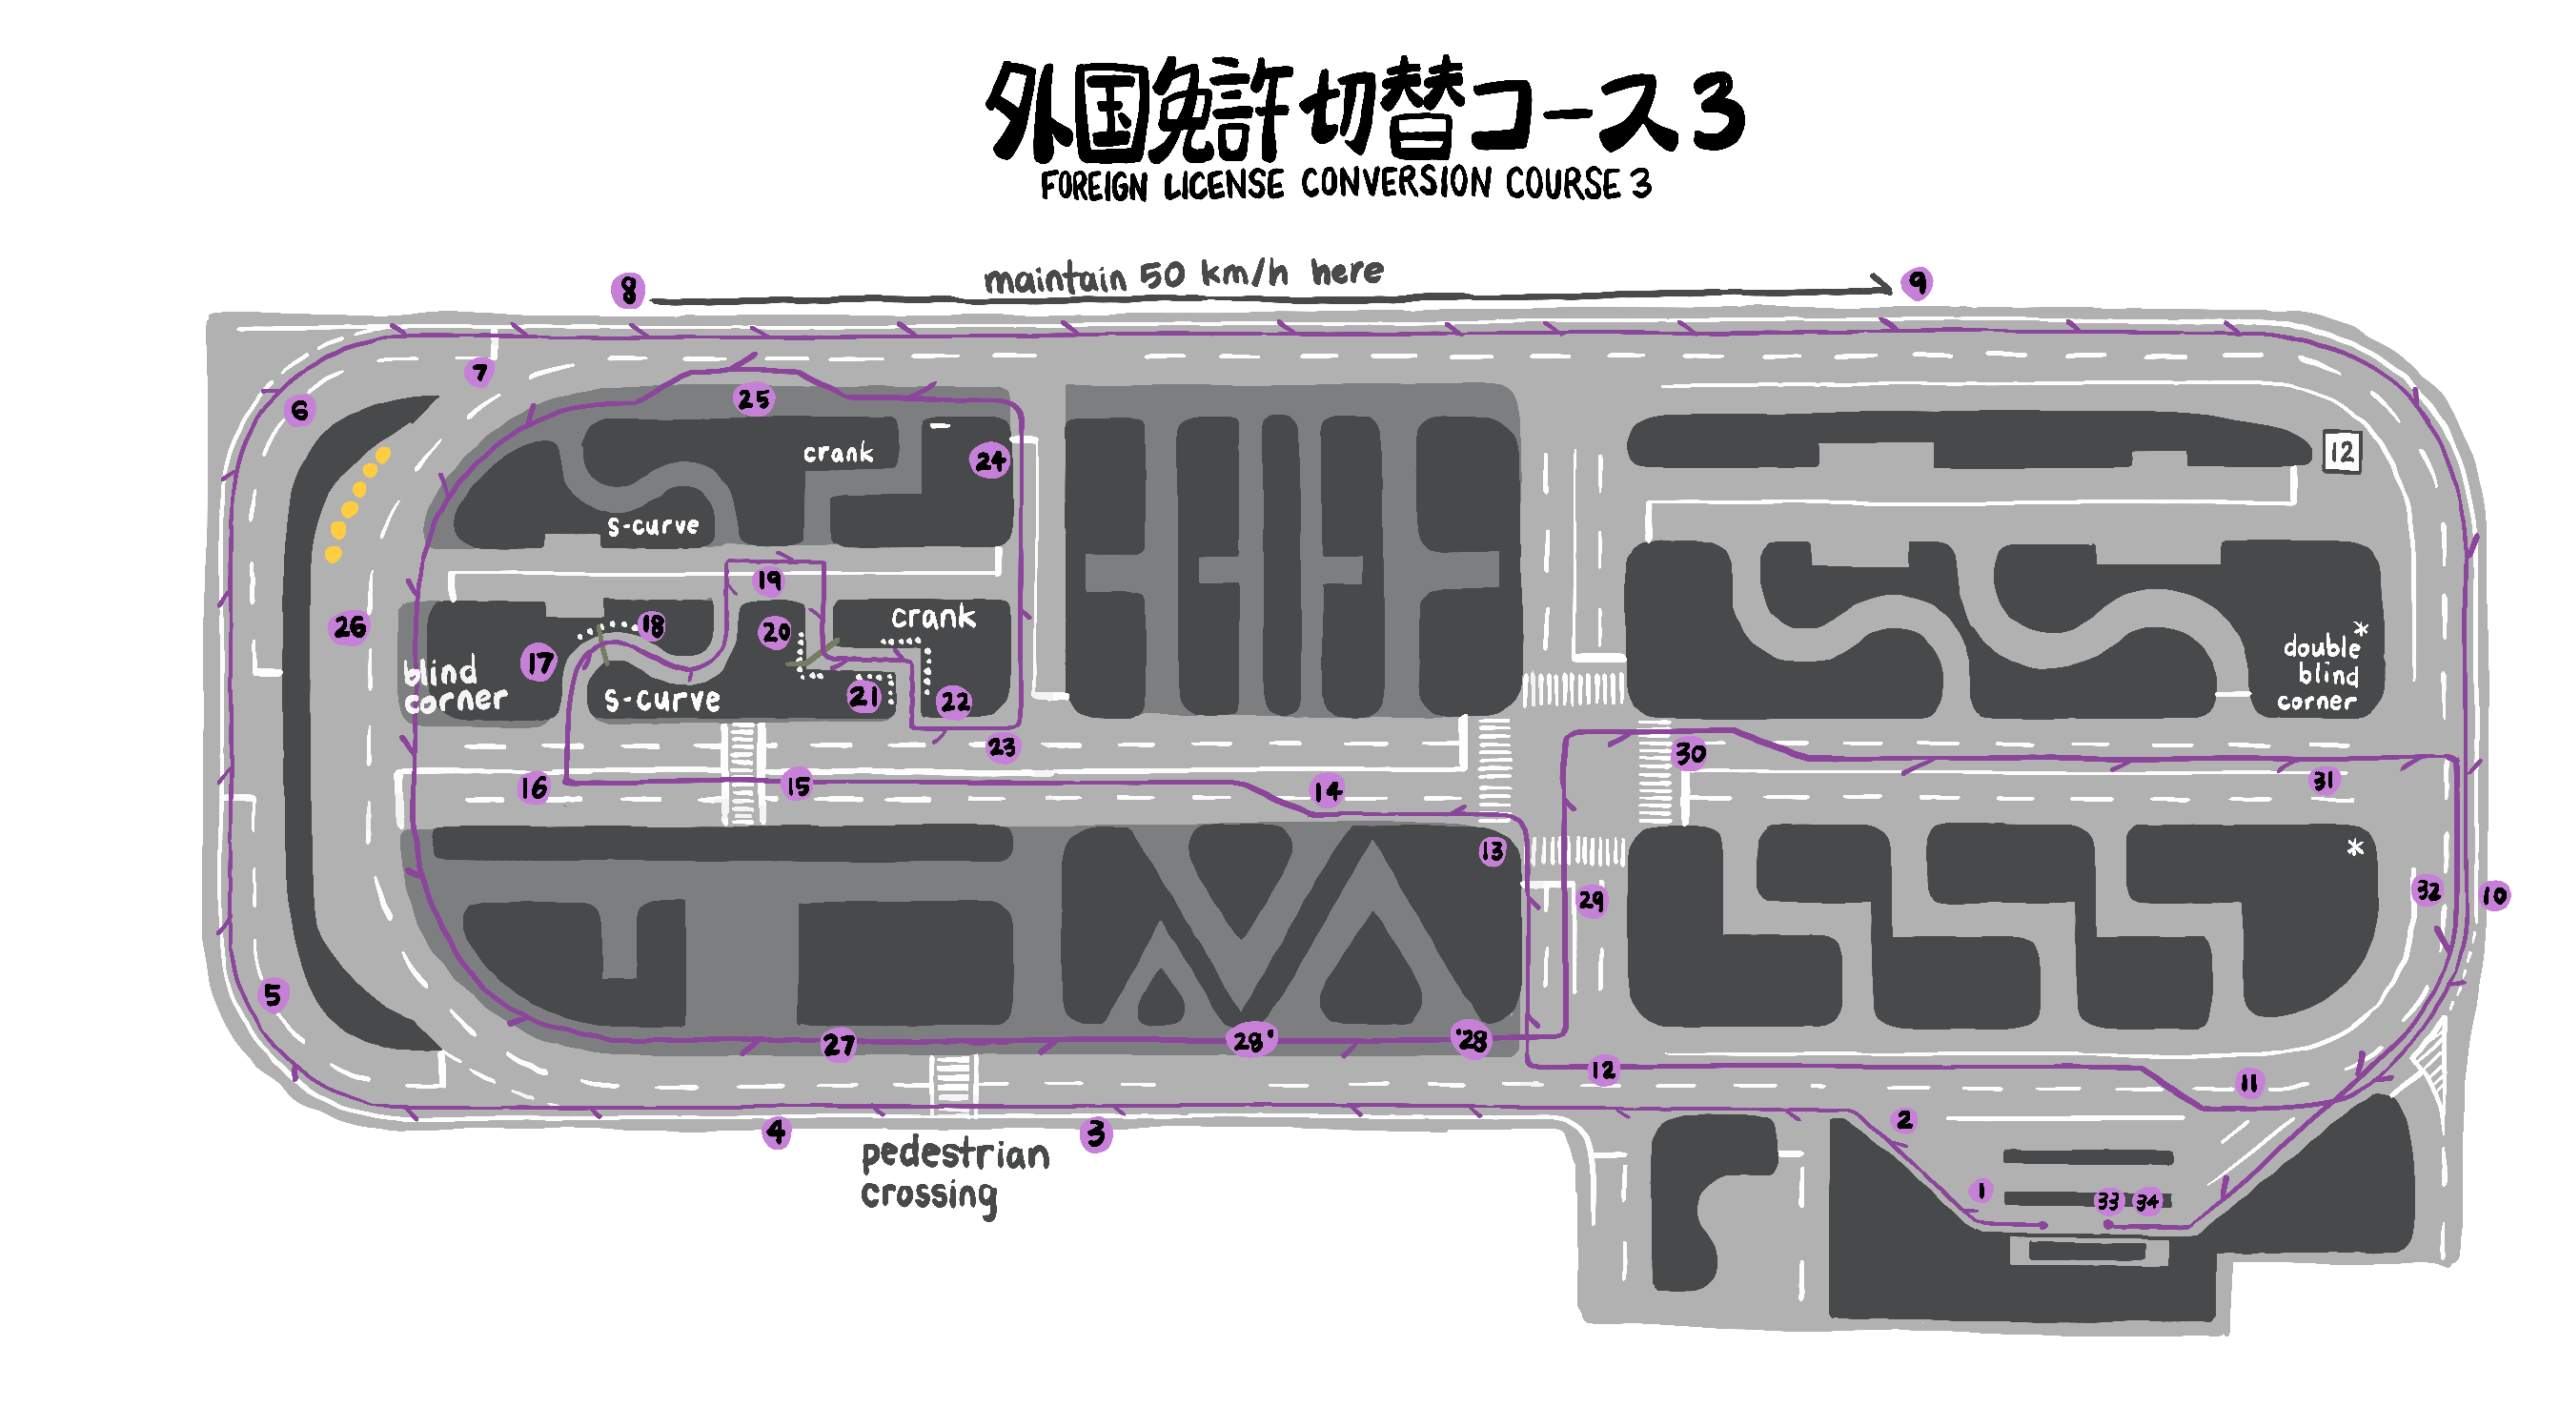
Course 3

It may help to think of Course 3 as divided into two distinct parts: the first big loop around the outside of the course, and the second part where you will traverse the inside of the course. 

  1. After you’ve pulled away from the starting point, immediately turn on your left signal. You will need to slow down and prepare to turn left to merge onto the course’s main road. 
  2. Check the road to your right and left, and check your back left for bicycles etc., then pull into the left lane of the road. Here, you can let your speed get up to around 30-35kph. 
  3. You will soon approach a crosswalk. Here, you do not need to slow down or stop, but make sure to visibly check left and right with enough time that you could stop if you needed to as you pass by. Do not step on the accel pedal as you do your check, but you’re fine to accelerate through the crosswalk once you have checked, if you need to.
  4. After passing through the crosswalk, immediately turn on your left signal, as you will soon branch off onto the outer loop road (also known as the portion of the course with the sloped road or 坂道 sakamichi). It’s important to turn on your left turn signal here even though you are simply proceeding straight because you are technically switching roads. Before branching off the road, check behind you to your left for bicycles. 
  5. Slow down significantly as you prepare to enter the curve approaching the hill. On the peak of the hill, there will be a line indicating where to stop. The steps you need to take here are, in order:
    1. Stop at the line on the upwards slope (using the foot brake like normal)
    2. Engage your parking brake
    3. Release the foot brake
    4. Check right and left
    5. Release the parking brake while simultaneously pressing the accel pedal
    6. Once you have crested the hill’s peak, you should begin lightly pressing the foot brake as you descend to keep your descent at a controlled, slow speed. Do not completely release the foot brake until you have reached the bottom of the slope. 
  6. Once you have descended the hill, immediately turn on your left signal. (Again, this may be confusing to some, as you will not actually be turning left after this, but rather merging into another road.) Before you reach the end of the silver guard rail to your left, you should check the road to your left for oncoming traffic. There should be none, so proceed to follow the curve of the road until you reach the stop sign (止まれ). 
  7. Come to a full stop at the line. Your signal may have automatically turned itself off during this curve, so if it has, make sure to hit the left signal one more time. Here is also a good point to take a big deep breath if you need one. Only once you’ve come to a full stop should you check the road to your right, and do your bicycle check to your back left. Once you’ve done that, proceed forward (turning your signal off if it hasn’t automatically done so).
  8. The next portion of Course 3 is a long, straight piece of track, where you’re encouraged to let yourself get up to about 50kph (do not go over 50, as it is the marked speed limit for this portion). 
  9. After proceeding for about 2/3 of the straight track, you will notice that the final 1/3 of the track is a slightly lighter color of concrete. You can use this as a marker for when to begin braking. What is important here is that the test proctors expect you to press the brake at least three distinct times, gradually slowing down each time. When you reach the curved corner of the track, you should be around 20kph, so you can loosely aim to slow down 10kph with each press of the brake. Proceed to follow the track along this corner, and then straight to approach the final corner of the first loop.
  10. Enter the final corner of the first loop around Course 3 at a relatively slow speed. (This is so you will have ample time to switch lanes once you straighten out.) You can think of this as the end of the first “half” or part 1 of Course 3.
  11. From here, you will begin the second portion of the course. You should currently be in the left lane of the road. As you pass in front of the starting point, turn your right signal on to prepare to switch into the right lane. Count three seconds, and then check your right side mirror and blindspot, swiftly switching to the right lane once you’re sure the coast is clear. When you enter the right lane, position the car on the right side of the lane, since you will be turning right shortly thereafter.
  12. Once you have switched lanes, immediately turn on your right signal again (if it hasn’t turned itself off from switching lanes, you can just leave it on). Your next move will be a right turn onto the road with two lanes in each direction that leads to the intersection with the traffic signal (there is only one traffic signal on the course). Slow down significantly as you approach the turn and check the intersecting roads to the left and right. Finally, just before you turn right, check behind you to your right for bicycles. Turn into the LEFT lane in front of the stoplight. (There is a small marking on the road here, but don’t worry, it’s fine to just drive over it and make your wide turn into the outer lane).
  13. In Course 3, you will turn left at the intersection with the traffic light (up until here, Course 3 and Course 1 have been the same. They differ starting with this turn). If the light is green when you approach, check right, left, your left blindspot, and proceed to make your turn into the LEFT lane of the road you’re turning on to. If it is red, stop at the line and wait until it turns green, upon which you should check right and left before releasing the foot brake, and then check your left blindspot. If the traffic light turns yellow as you approach/begin your turn, use your discretion. 
  14. Although you have just turned into the left lane of this road, you will need to switch lanes, so turn your right signal on. Wait three seconds, check your right side and right blindspot, and quickly move to the right lane, hugging the right side. 
  15. You will soon come across a railroad crossing. Here, you need to come to a full stop at the line marked on the road. While stopped, roll down your window a little bit and “listen” for sounds of any trains approaching as you check left and right. Then proceed through the railroad crossing, turning your left signal on shortly after you have passed through it. 
  16. After the railroad crossing, you will be taking the first right turn, ㉔, so turn on your blinker immediately after passing through the x-ing. Check your right blindspot before turning into the S curve section at ㉔. 
  17. For this section, take it slow and make your turns wide. 
  18. Halfway through the S curve, turn on your right signal to prepare in advance for your next turn. When you approach the exit of the S curve section, your goal is to be centered in the exit (if you return your steering wheel to straight too soon or too late after the last S curve, you will end up on the far-left or far-right side of the road at the exit). 
  19. Once you’ve finished the S curves, you will be performing two right turns in quick succession. Making sure your right signal is still on, check right and left as well as your right blindspot before making the first of these turns, hugging the right side of the lane. Next, immediately turn your right blinker back on and check your right blindspot again before taking the very next right turn into ㉝: a sharp turn into the 90-degree angle (or crank) turn section.
  20. For the crank turns, you should be aiming to align the curb of the side of the road closest to you with about where your knees are inside the car**. You can and should go slowly through this whole section, although you shouldn’t stop completely. If you accidentally ride up on the curb, calmly reverse and fix your course (reversing off a curb isn’t an immediate failure here, but hitting the “wall” of yellow poles is). 
  21. Before your last crank turn, turn on your left signal in advance, as you will eventually turn left out of this section.
  22. After you’ve finished the crank section, check for traffic right and left, as well as your left blindspot, and turn into the left lane of the main center thoroughfare. Once you’ve made this turn, immediately turn on your left signal once more and prepare to make the next left turn.
  23. Check your left blindspot and turn left. You should now be on a straight road with a stop sign at the end of it. 
  24. As you approach the stop sign, turn on your left turn signal. After stopping at the stop sign, check right and left, as well as your left blindspot, before turning left onto a narrow one-way road.
  25. Next, you will need to avoid the parked car on the left side of this road. As you approach the car, turn your right signal on (since you’re avoiding an obstacle here, there’s no need to wait 3 seconds). Check the road ahead of you for oncoming traffic as well as your right mirror and blindspot before moving to the right to avoid the parked car. You should aim to leave about 1m of space between you and the car, but do not go fully over the line; instead, aim to straddle it. You will want to be going relatively slow, but there’s no strict need to brake as you pass by the car. When the parked car is aligned with your left, turn your left signal on and check your left blindspot for bicycles. Once you’ve passed the car, you should quickly return to the lane.
  26. Stay on this road and follow the curve, proceeding forward. You will eventually approach a road branching to your left with tall blocks obstructing your view of any approaching cars. You will be continuing straight through this, but you should lean forward to see past the blocks to your left, and not proceed completely until you can do so. 
  27. Proceeding further, you will come back across the crosswalk (this way, from the opposite direction). Once again, visibly check right and left as you approach, but no need to slow down or stop. 
  28. Once you reach marker ⑱ on your left side, turn on your left blinker, and start braking at ⑯ to prepare to turn left back onto the road leading to the traffic signal intersection. Check your left blindspot and turn into the far RIGHT lane. Hugging the right side of this lane, immediately turn on your right signal, as you will be turning right through the traffic signal intersection. 
  29. If the traffic signal is green when you approach, check right, left, and your right blindspot and proceed to make a right turn by following the markers on the ground in the center of the intersection (you can drive over where the arrow is, but don’t drive on the shape with diagonal lines through it). You will be turning into the LEFT lane. If the light is red, stop at the line and wait until it turns green, upon which you should check right and left before releasing the foot brake, followed by your right blindspot. If the traffic light turns yellow as you approach, use your discretion. 
  30. Soon after turning right at the intersection, you will need to switch to the right lane. Quickly turn your right signal on, wait three seconds, and check your right mirror and right blindspot before switching lanes. You will want to position yourself in the right side of the right lane, as you will be making a right turn next. Once you’ve switched lanes, either keep on or turn on your right signal once more.
  31. Next, you will approach a T intersection with tall blocks obstructing your view to the left and right. You will be turning right here. Slow down to a crawl as you approach this intersection and creep forward, physically leaning forward in your seat to look left and right back and forth, until you can see past the blocks. Making sure your right signal is still on, complete your checks to the right, left, and finally, right blindspot. Make a wide right turn into the LEFT lane of the road, positioning your body in the center of the lane.
  32. Immediately after making a right turn back onto the main outer loop road, turn your left signal on (you did not use your left signal the first time you passed by here, but since you will be pulling off the road into the starting area this time, you need to use it the second time around). Check your side left and back left blindspot quickly before pulling off into the starting zone, easing into the parking bay. You should end with the car in between the black and yellow poles with less than 30cm between the car and the curb, and the car and the black and yellow poles in front. 
  33. Put the car in park, engage the e-brake, and turn off the ignition.
  34. Finally, look out the driver’s side window and at the right side-view mirror to check for traffic left and right before opening your door. When you do open it, open it just a crack at first to warn “drivers” behind you, and pause before opening it fully. Close the door behind you, and your test is complete. Great work!

Course 3 Turn Order: L (out of starting gate), R, L (intersection), R (24), R (out of S), R (33), L (out of crank), L, L (stop sign), L, R (intersection), R (blocks), L (into starting gate)

Tips to Remember Course 3: 

    • Full loop FIRST
    • Lane change when passing back in front of starting gate
    • First turn of the course is R into the L lane
    • L and then later R turn at traffic light intersection (no straight through)
    • S/crank area is different from Course 1/Course 2, unique to Course 3
    • Go straight past ⑥
    • After second crosswalk turn left to approach traffic light intersection 
    • Turn right at blocks T-intersection, then immediately pull into starting gate to end
    • Course 3 has three lane switches (not including avoiding the parked car)
Appendix B

Here’s a list of the websites that were linked or mentioned throughout the explanation, as well as a few others. Together with this guide, we hope you’ll find all the information you need for a smooth journey through the license conversion process in Tokushima!

  • JAF website – (English)  The Japan Automobile Federation is your source for an official license translation (one of the documents needed in the license conversion process).  On the website, you can read a little more about the conversion process, as well as how to request a translation document from JAF.  You can also download the translation application if you plan on mailing in your request.
  • Hyperdia – (English)  For those of you who need to coordinate a way to get to the license center, this is the go-to website for train times in Japan.  The only drawback is that you have to know the exact name (in romaji) of the station, or it won’t find it.
  • Google Maps – (English)  Setting the route to “public transportation” works pretty well to look up the train schedules in the prefecture, but some bus routes (like Tokushima Bus) won’t show up as part of the search
  • Japanese Road Signs and Markings – (English)  Link to a PDF that reviews Japanese road signs and markings.  Helpful for reviewing before any written/practical tests, or just to review before you get on the road here.

Appendix C

Below are a few terms you may run into/have need of during the license conversion process.

  • foreign license conversion   外国免許証切り替え   gaikoku menkyosho kirikae
    • (sometimes abbreviated to 外免切り替え gaimen kirikae)
  • driver’s license   運転免許証  unten menkyosho
  • residency certificate   住民票   juuminhyou
  • residency card   在留カード  zairyuu kaado
  • registered post   現金書留 genkin kakitome
  • business trip  出張 shucchou
  • vacation days off   年休 nenkyuu
  • car  車  kuruma
  • regular vehicle   普通車  futsuusha
  • Motorcycle  オートバイク  ootobaiku
  • automatic transmission  オートマチック   ootomachikku
    • (or エィー・ティー [A.T.])
  • manual transmission  マニュアル  mannyuaru
  • written test  筆記試験  hikki shiken
    • (or ペーパーテスト)
  • practical test   実地試験   jicchi shiken
    • (or ドライビングテスト⋆ロードテスト are also often used)
  • lane change  進路 変更   shinro henkou
  • Stop 止まれ tomare

Follow Us

Reach out to us at the links below, and be sure to follow us on Instagram and join our Discord for the latest updates on upcoming events and information! Need to get in contact with someone directly? Reach out via our email!
All rights reserved ©Tokushima AJET | Web Design By Gabrielle Vasquez | Art by Katya