
The Journey to ETC
Katya
07.09.2026
Before driving in Japan, I’m sure the last thing on some people’s minds is how they will pay for the tolls when travelling by car. Rightfully so, as the process is generally easy in other countries. Little does one know that getting an ETC card for a car can often be months long, sometimes even up to a full year, depending on the route you choose when acquiring your required Japanese credit card to tie to your ETC. Here’s a full recount of the process I went through over a year ago as advice to those going through the same procress!
What is an ETC Card?
If you’re from America, an ETC card is basically the Japanese EZ-Pass but more inconvenient because we need a Japanese credit card, a card that is difficult to obtain as a foreigner, particularly if your name is long. Also, you need a special card reader installed in your car to use it.
You get charged to your Japanese credit card and pay it off that way, similar to other toll passes.
Why bother?
Convenience and discounts basically. As you may notice when you are driving around Japan, tolls are not cheap. Not only are they not that cheap, they are plentiful, even more so if you don’t have an ETC card. There are two types of tolls, ones where you pay based on the distance you travel from your initial gate and ones where you pay a one time flat fee.
Despite having an ETC card, there is not much of a discount on Shikoku roads island wide. Most discounts you will get come with going to the mainland. But most importantly, the bridges on and off of Shikoku become significantly cheaper with an ETC!
For example, traveling from Naruto to Kobe-Nishi through Awaji, where my beloved Costco resides, on a weekday in a regular sized vehicle with an ETC costs 3,340 yen. Without an ETC, that cost would jump up to 5,710 yen.
With an ETC, you also won’t have to worry about carrying enough cash with you for the tolls, as all toll gates do not take debit cards, only credit cards.
Even more than potential discounts, some toll gates are ETC only! It can be hard to tell sometimes, but on an ETC only exit, the sign prior to it should have a purple sign saying ETC only, or ETC専用 in Japanese. If you do by accident go onto an ETC only exit and you don’t have an ETC, you will have to press the call button or even sometimes call a specific number and explain you made a mistake so they can let you turn around and get back on the highway.
It can also be inconvenient when it comes to navigating, since you might not be able to take the exit your navigation is recommending you to take due to the fact the exit is ETC only, which, of course, can then change the price of your toll. Google maps also currently does not inform you if the exit is ETC only. For example, the exits that most navigation systems tell you to exit at and enter at for the Takamatsu airport are ETC only. So you have to go farther both times to get off and on the highway, adding time and cost to the commute. Slowly, these ETC only exits are increasing, so getting an ETC card may be worth it just for the convenience. Recently, a friend of mine, was stuck searching for a non-ETC entrance coming out of Osaka even since again, google maps does not distinguish differences between ETC only and non-restricted toll entrances.
How Do I Procure an ETC Card?
First, you should weigh your credit card options. I won’t be advising credit cards here and which ones you should use, but I can say that Rakuten is rather convenient. They do have some English support for when you have more complicated problems, and Rakuten’s ecosystem is rather convenient as well if you choose to tack on their phone and internet service. They also have a great point system, and you can often scan your point card at the gas station for cash back rewards. I will be using Rakuten as a reference, as it was the card I ended up choosing.
The reason why I chose Rakuten is that they actually offer to set up the credit card and ETC at the same time. The cards won’t come at the same time, but the ETC card will be sent soon after your credit is operable.
The application process is rather easy. I will be writing this blog as a follow along, but the application may change in the future, so this process may become out of date.
Before beginning the application process for the Rakuten card, you will need your residence card, Japanese phone number, an ETC card reader, and a Japanese bank account. Lastly, you will also have to have lived in Japan for at least a year before being allowed to apply.
Rakuten Application Process (as of writing)
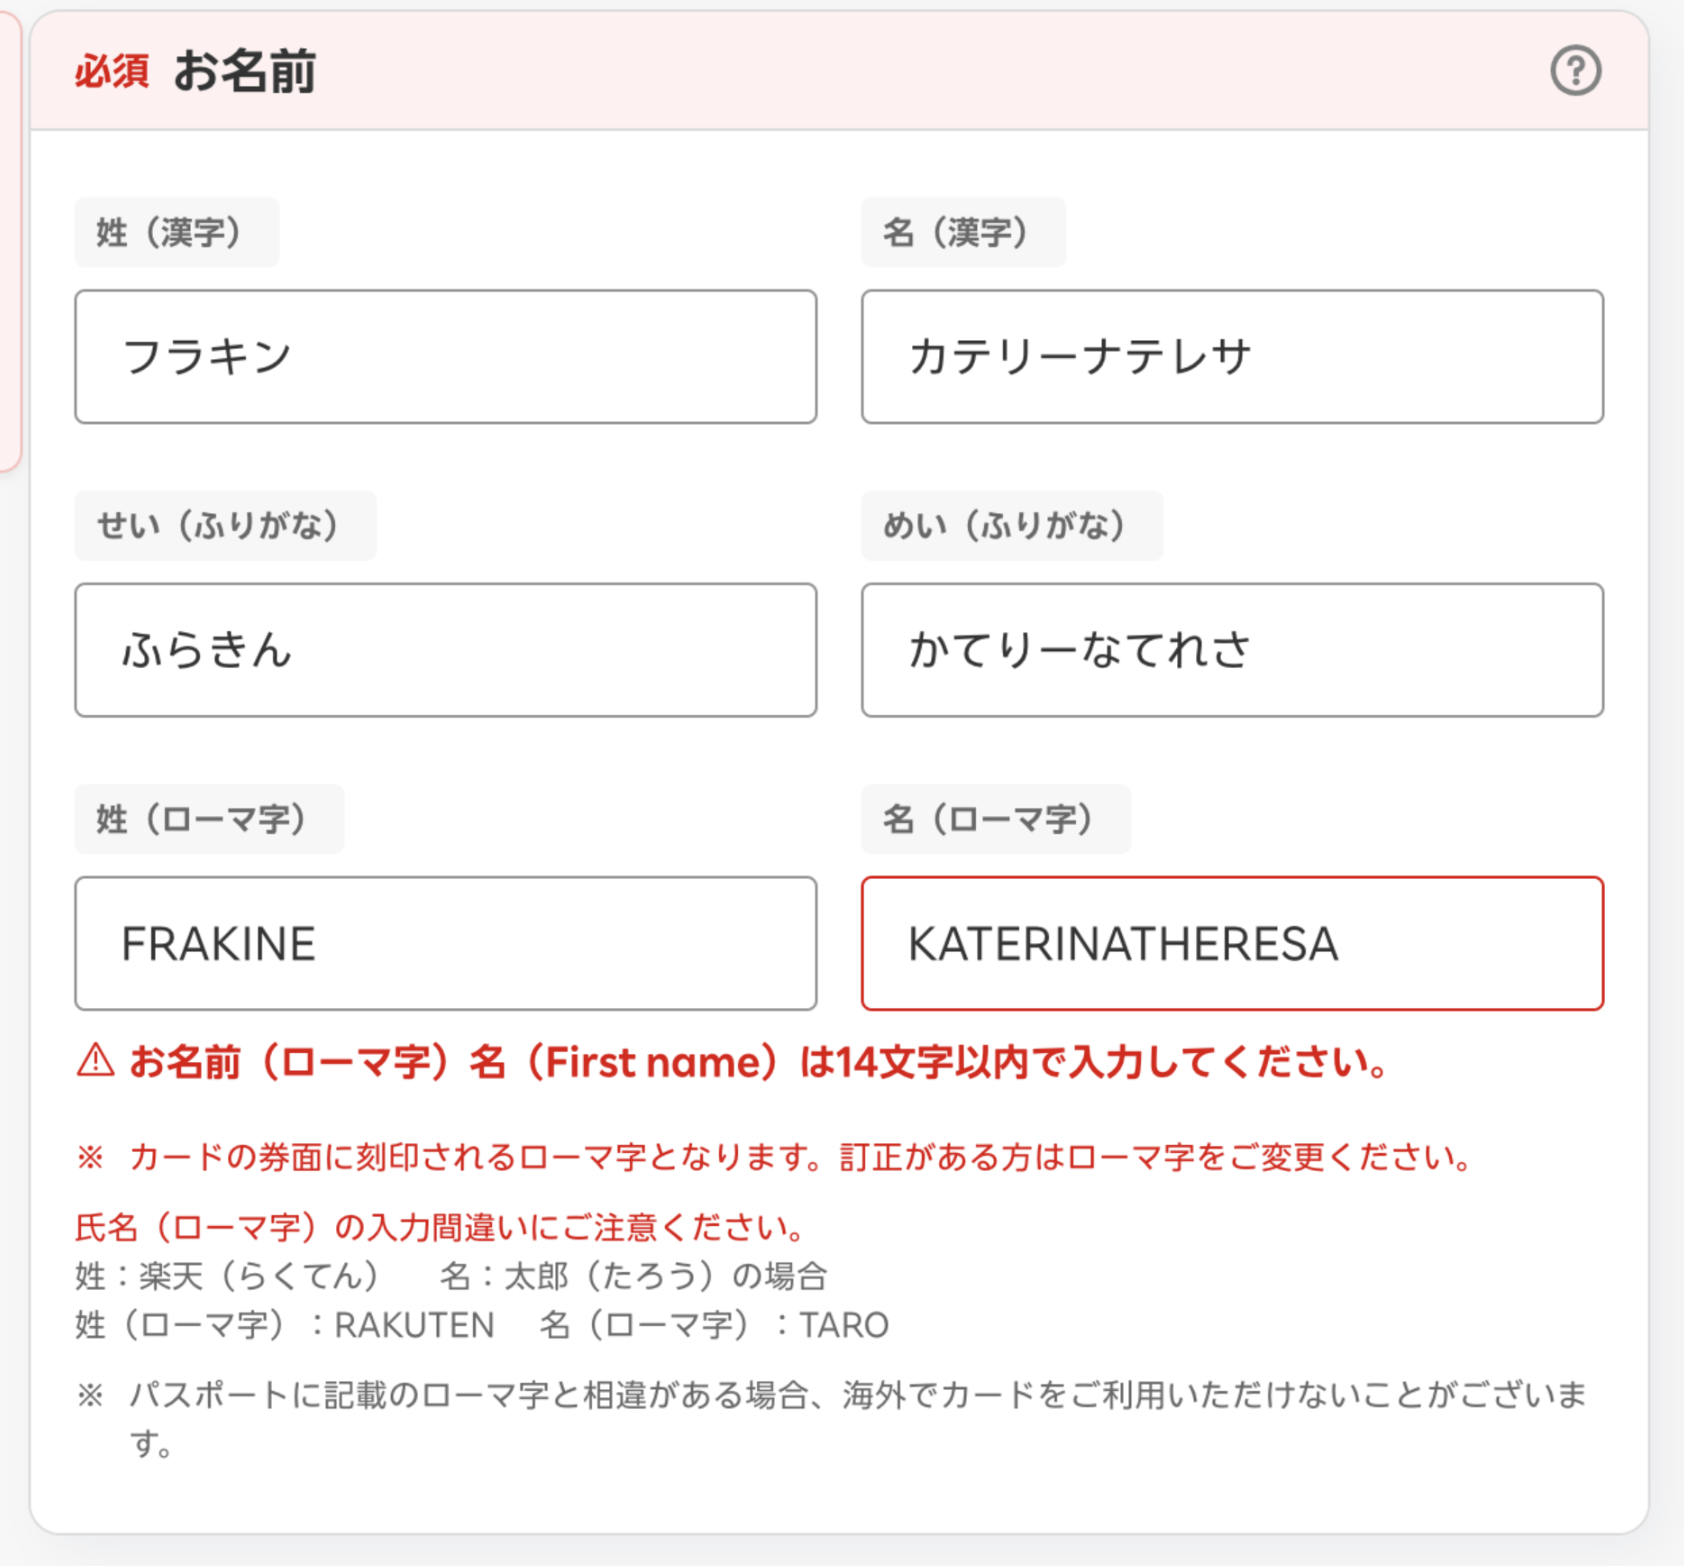
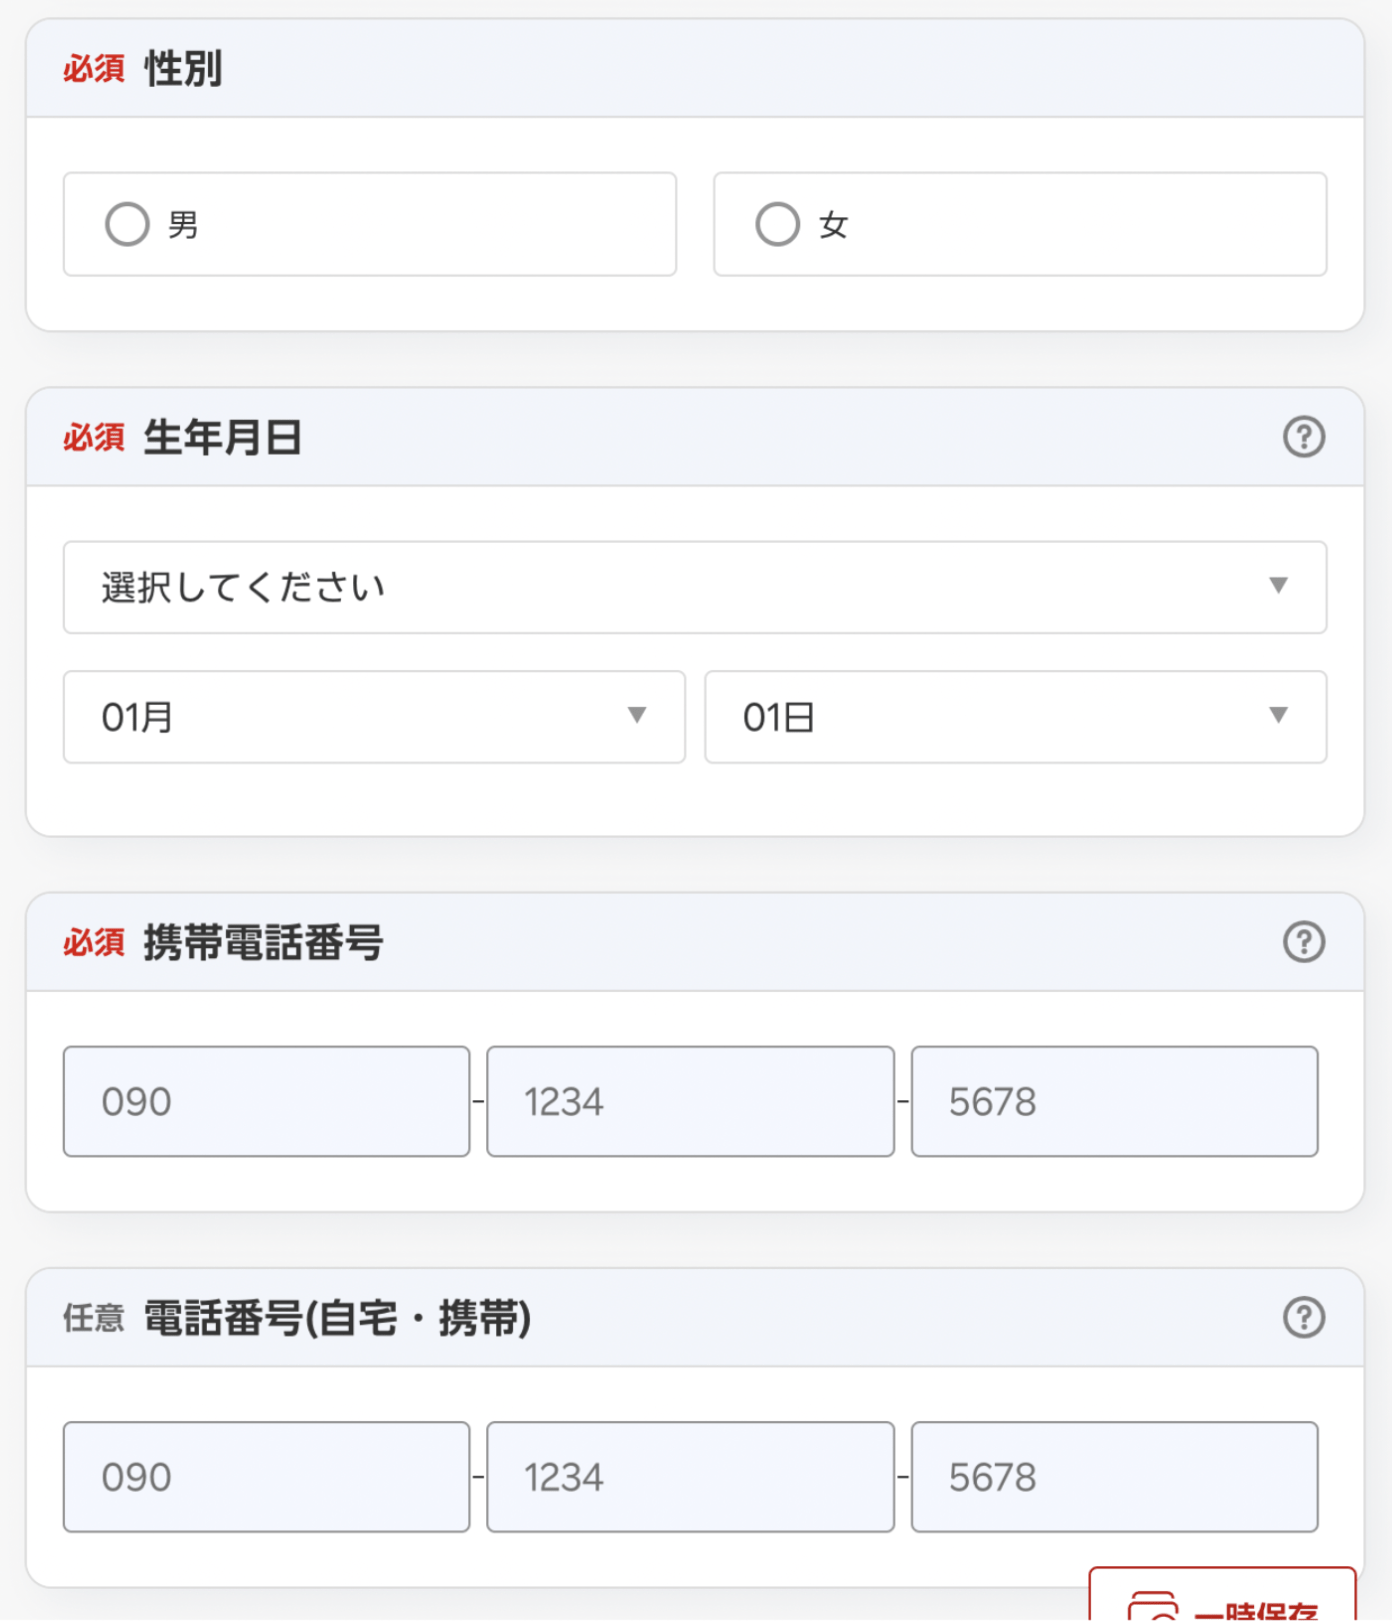
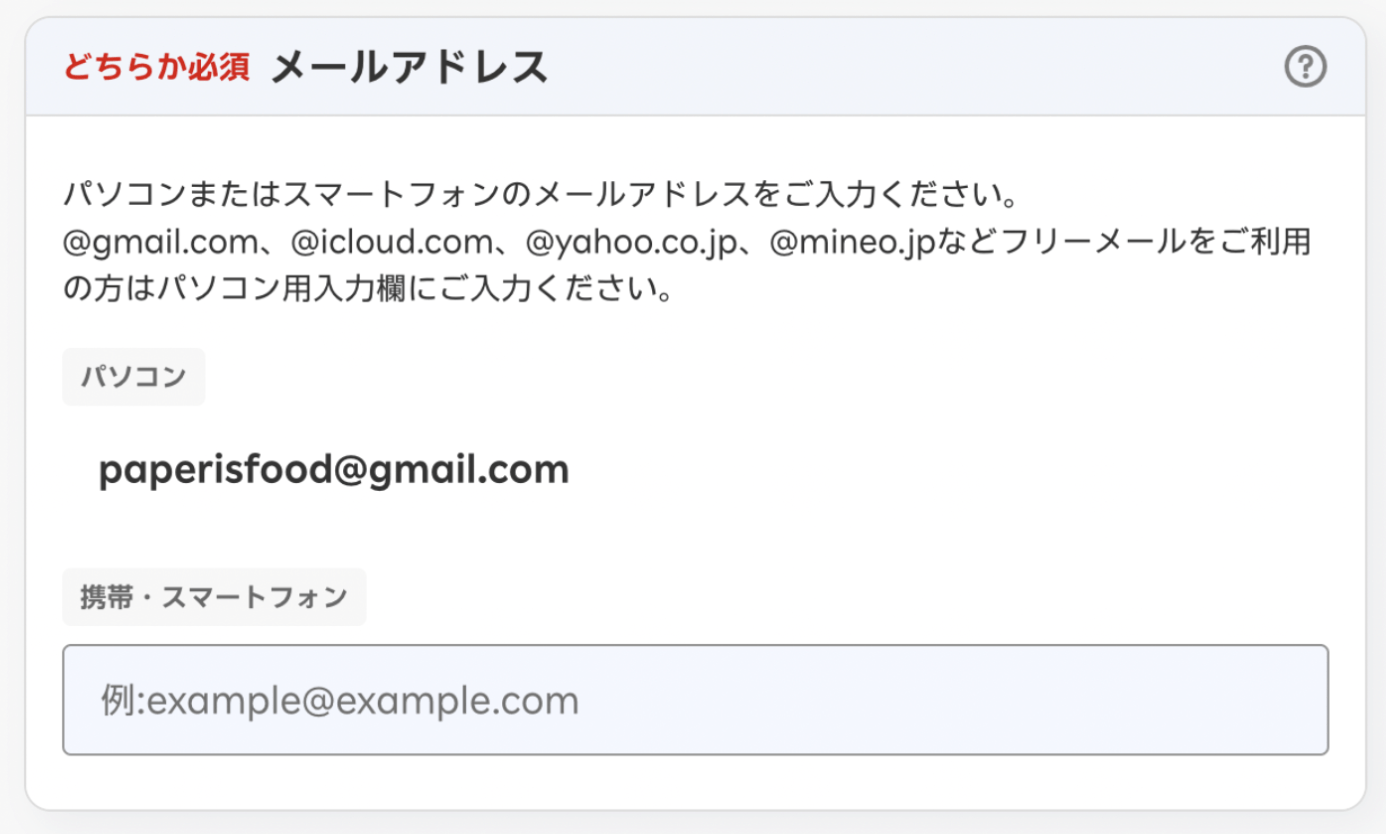
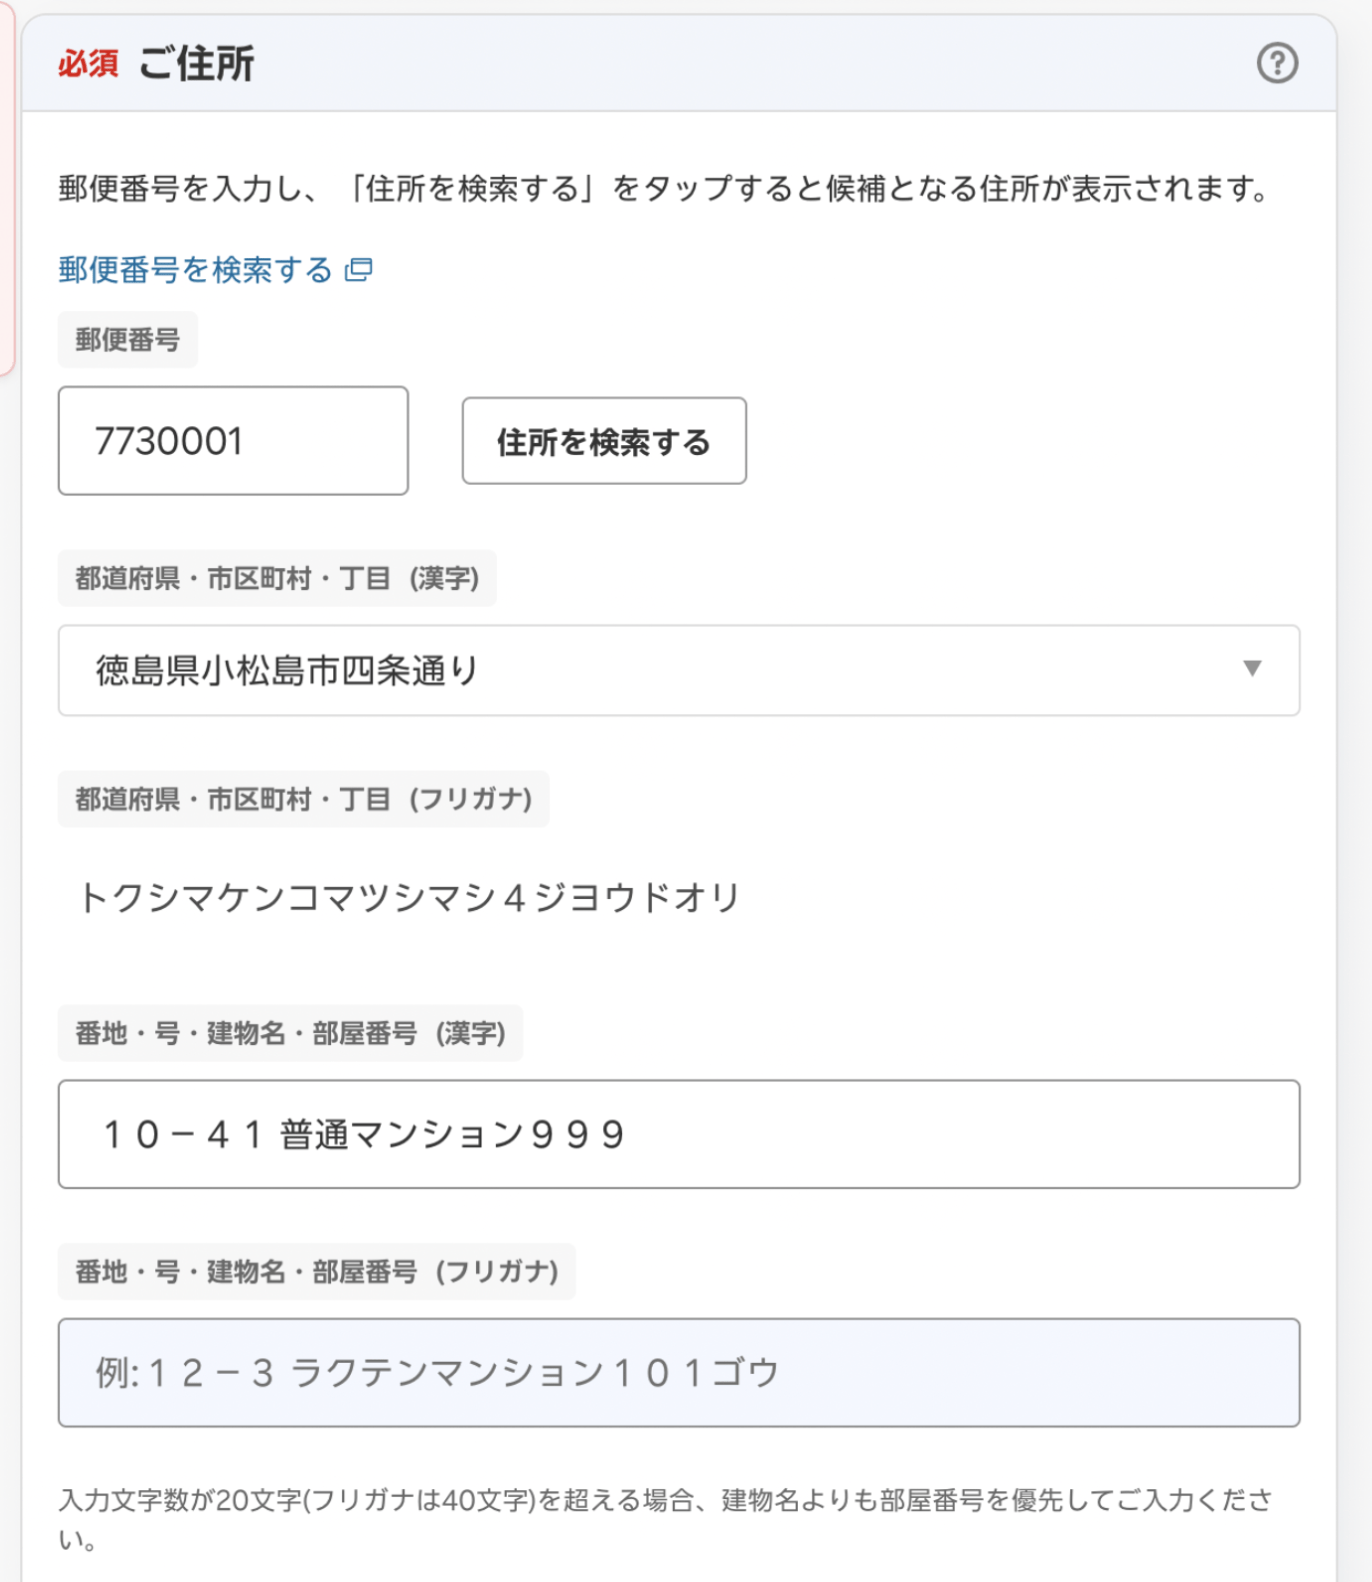
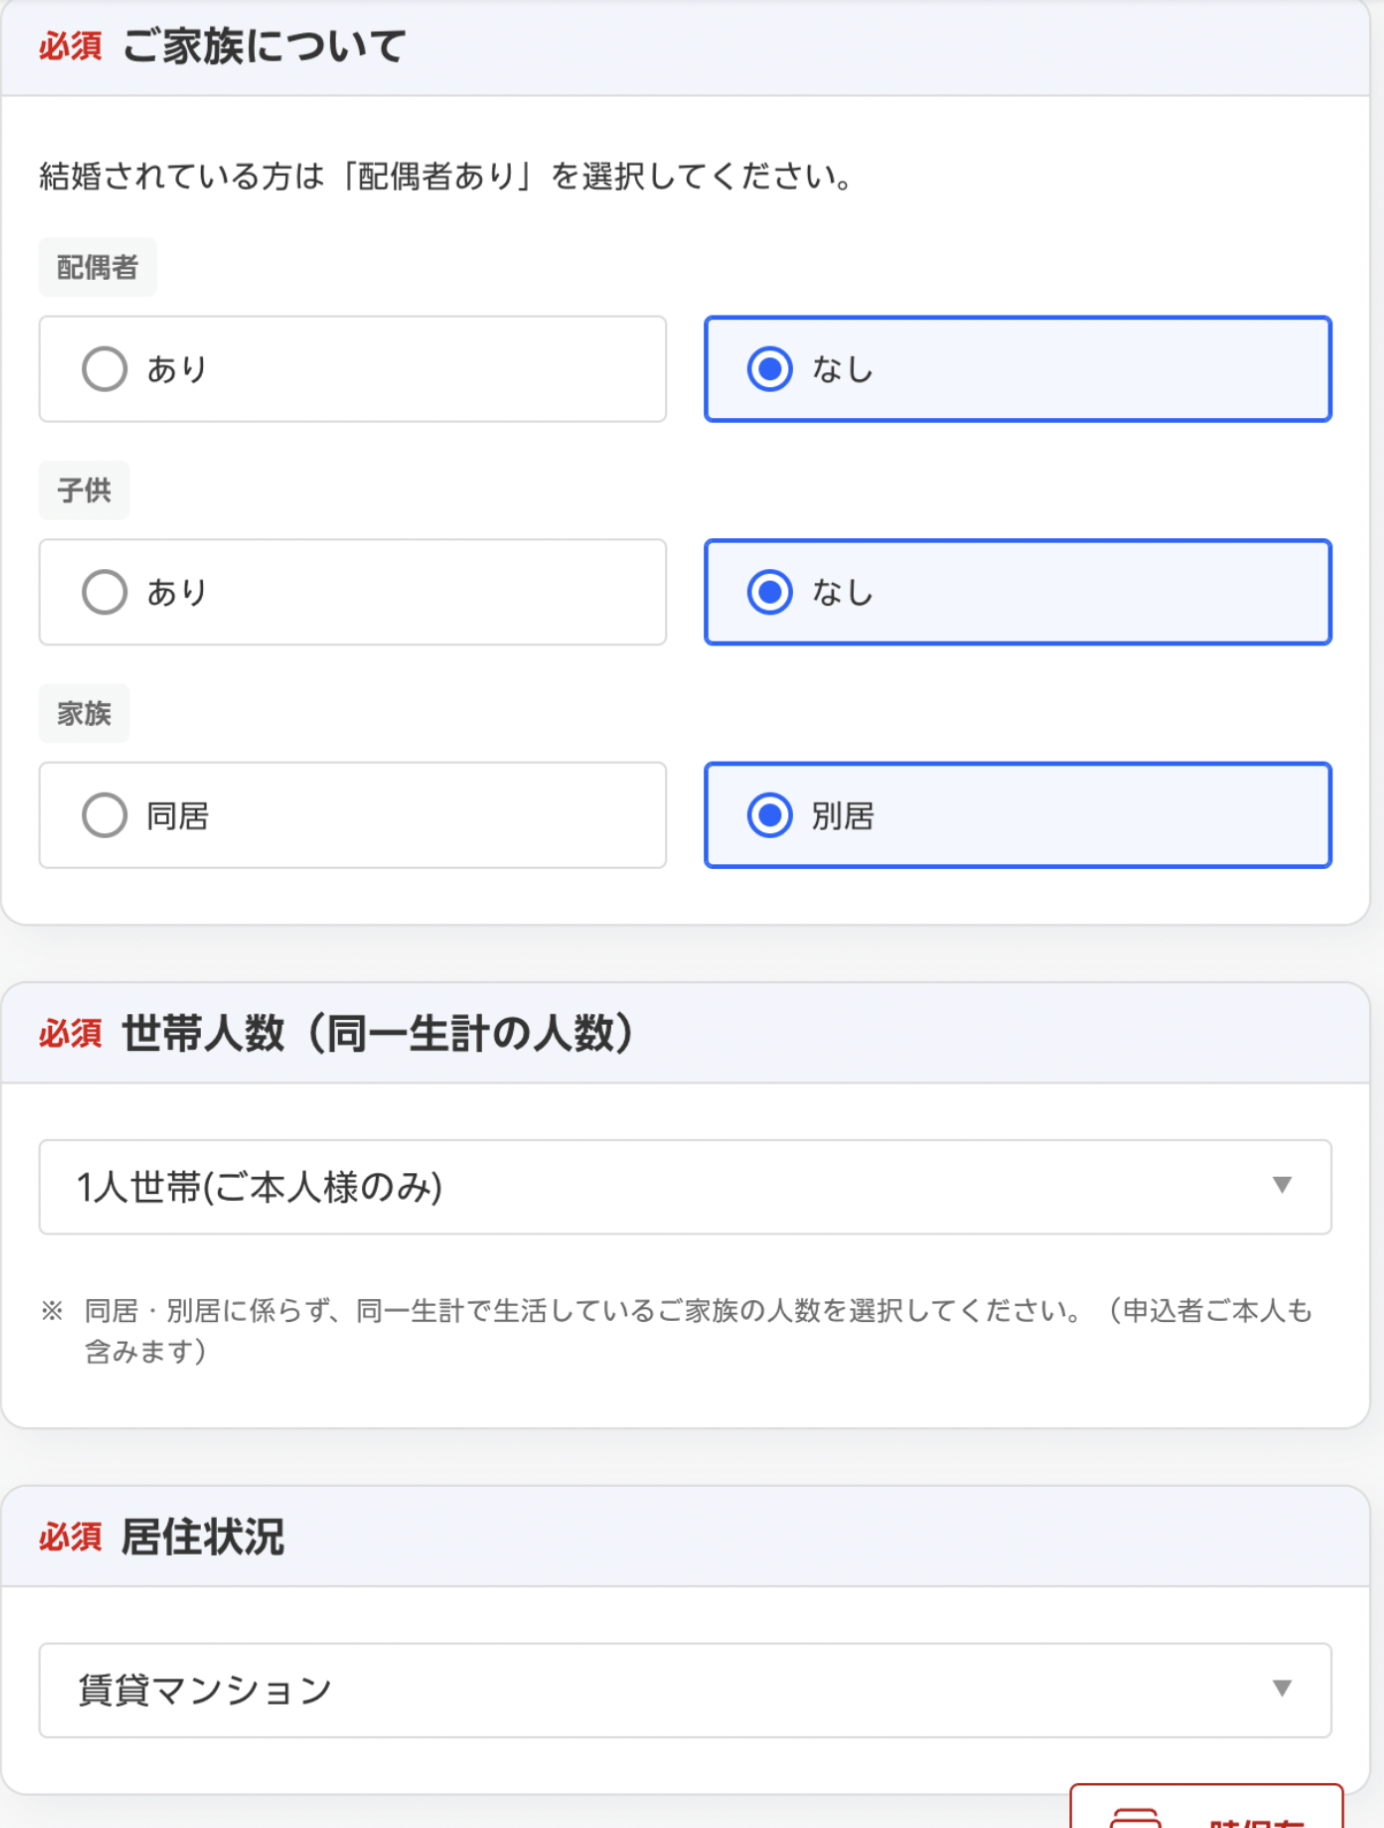
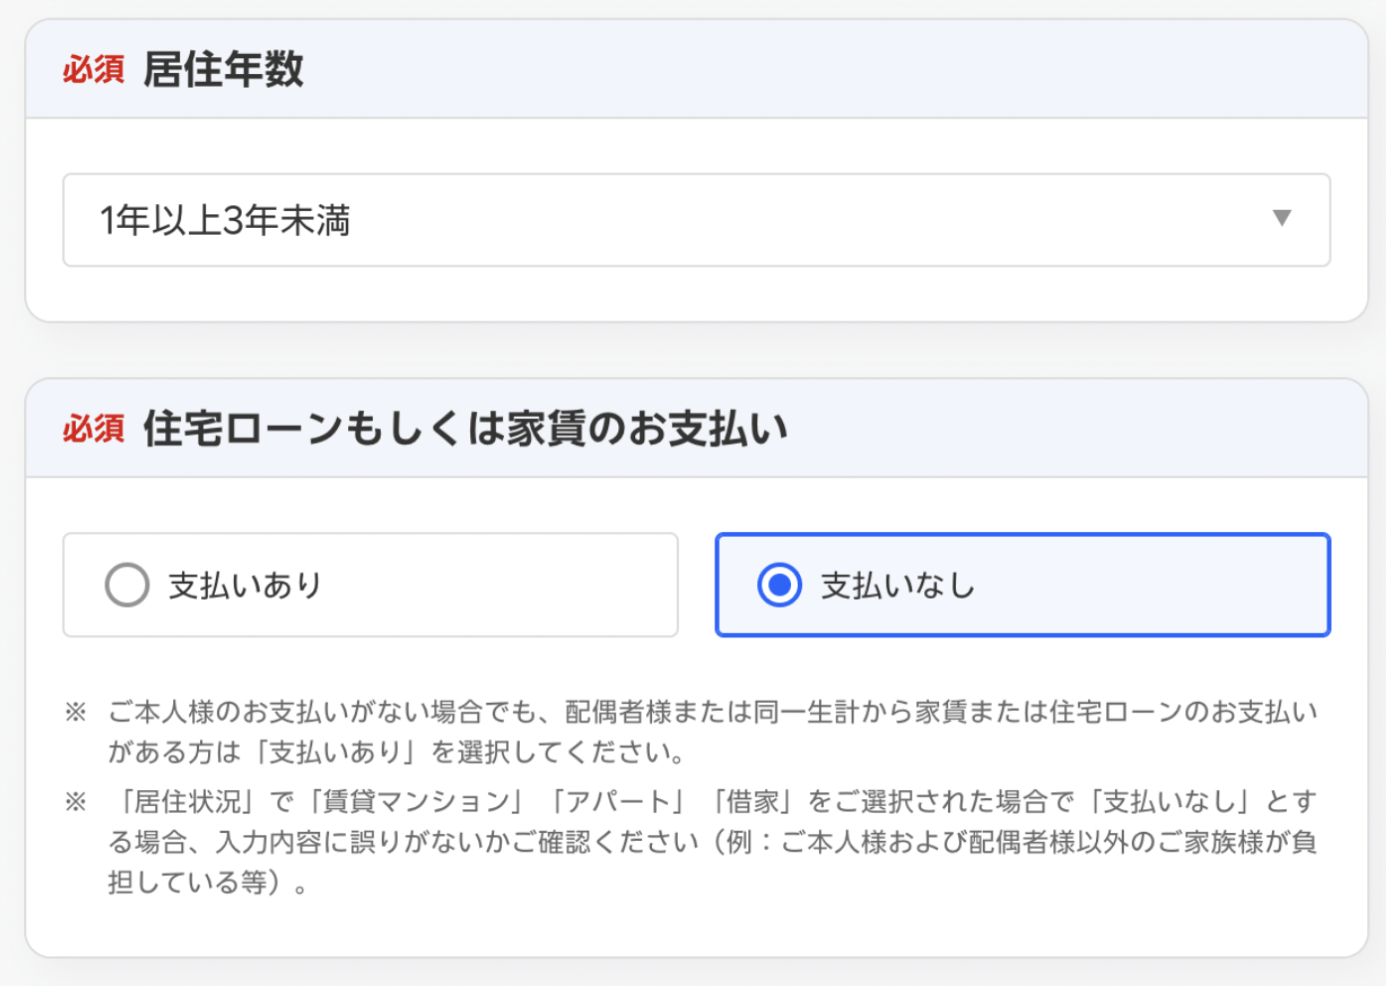
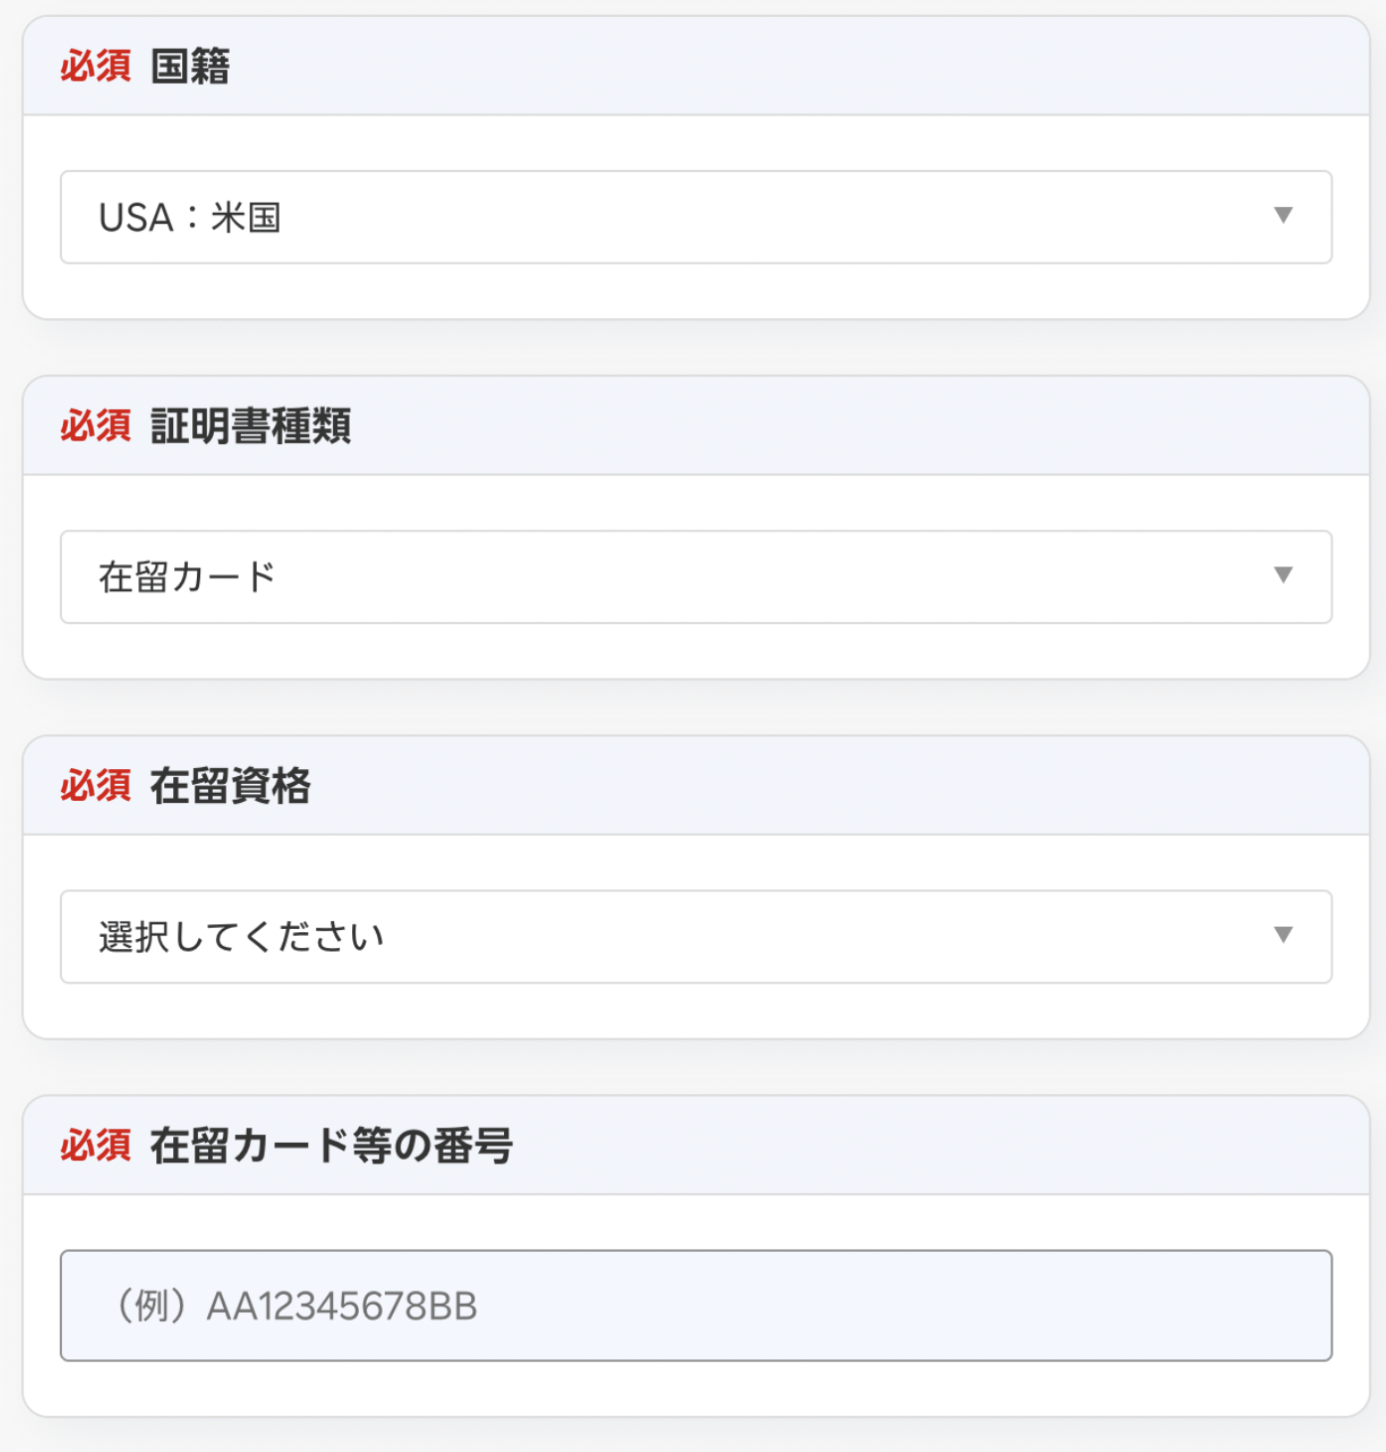
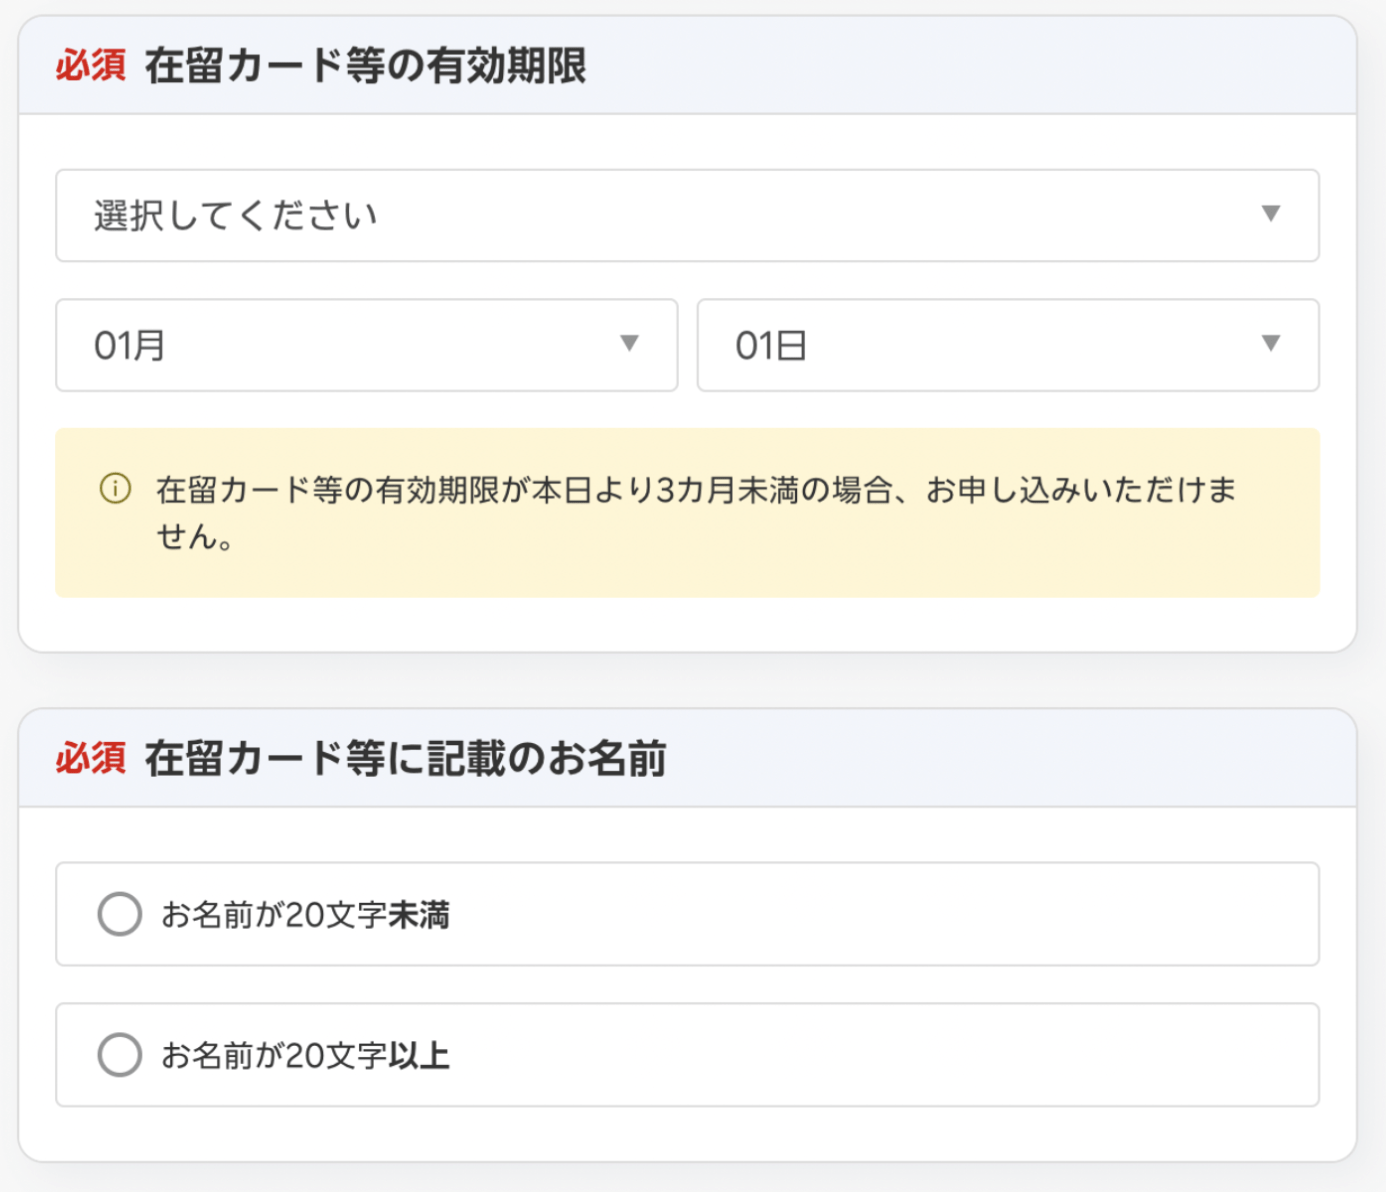
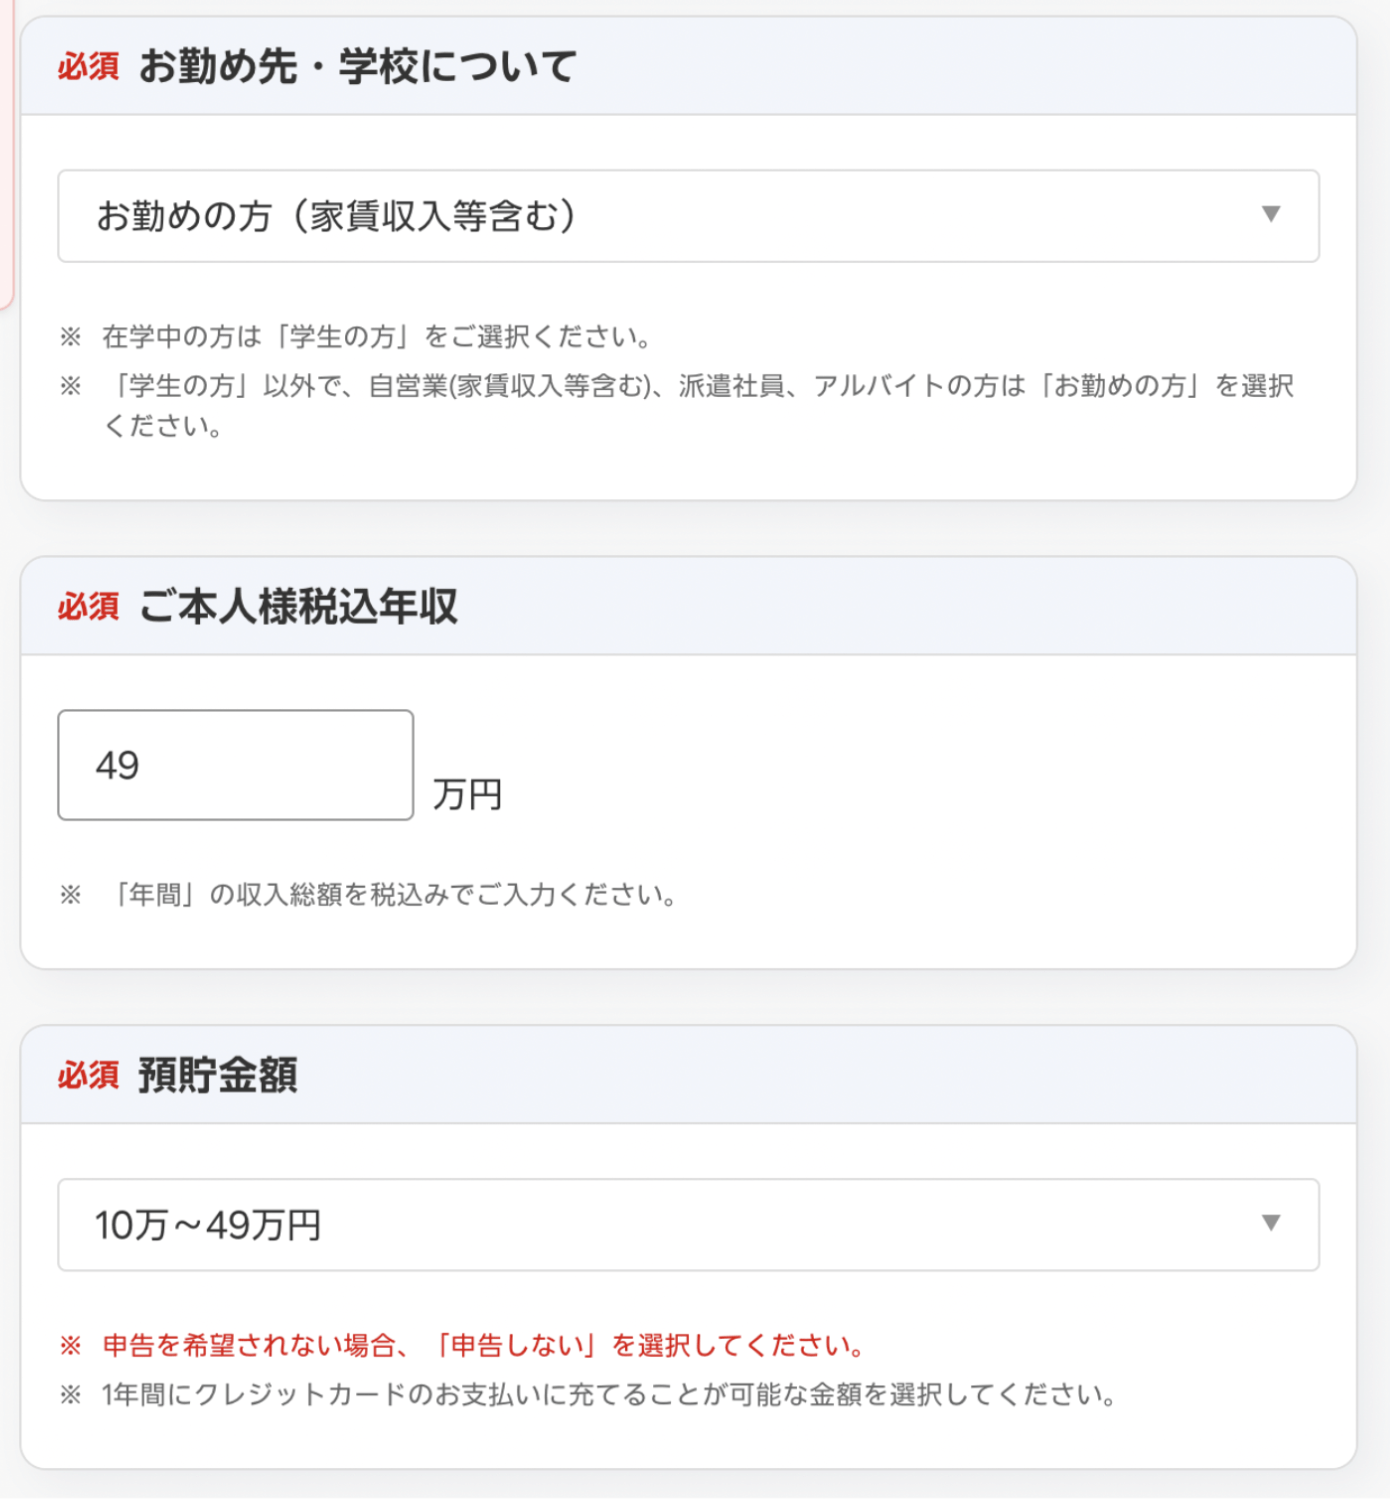
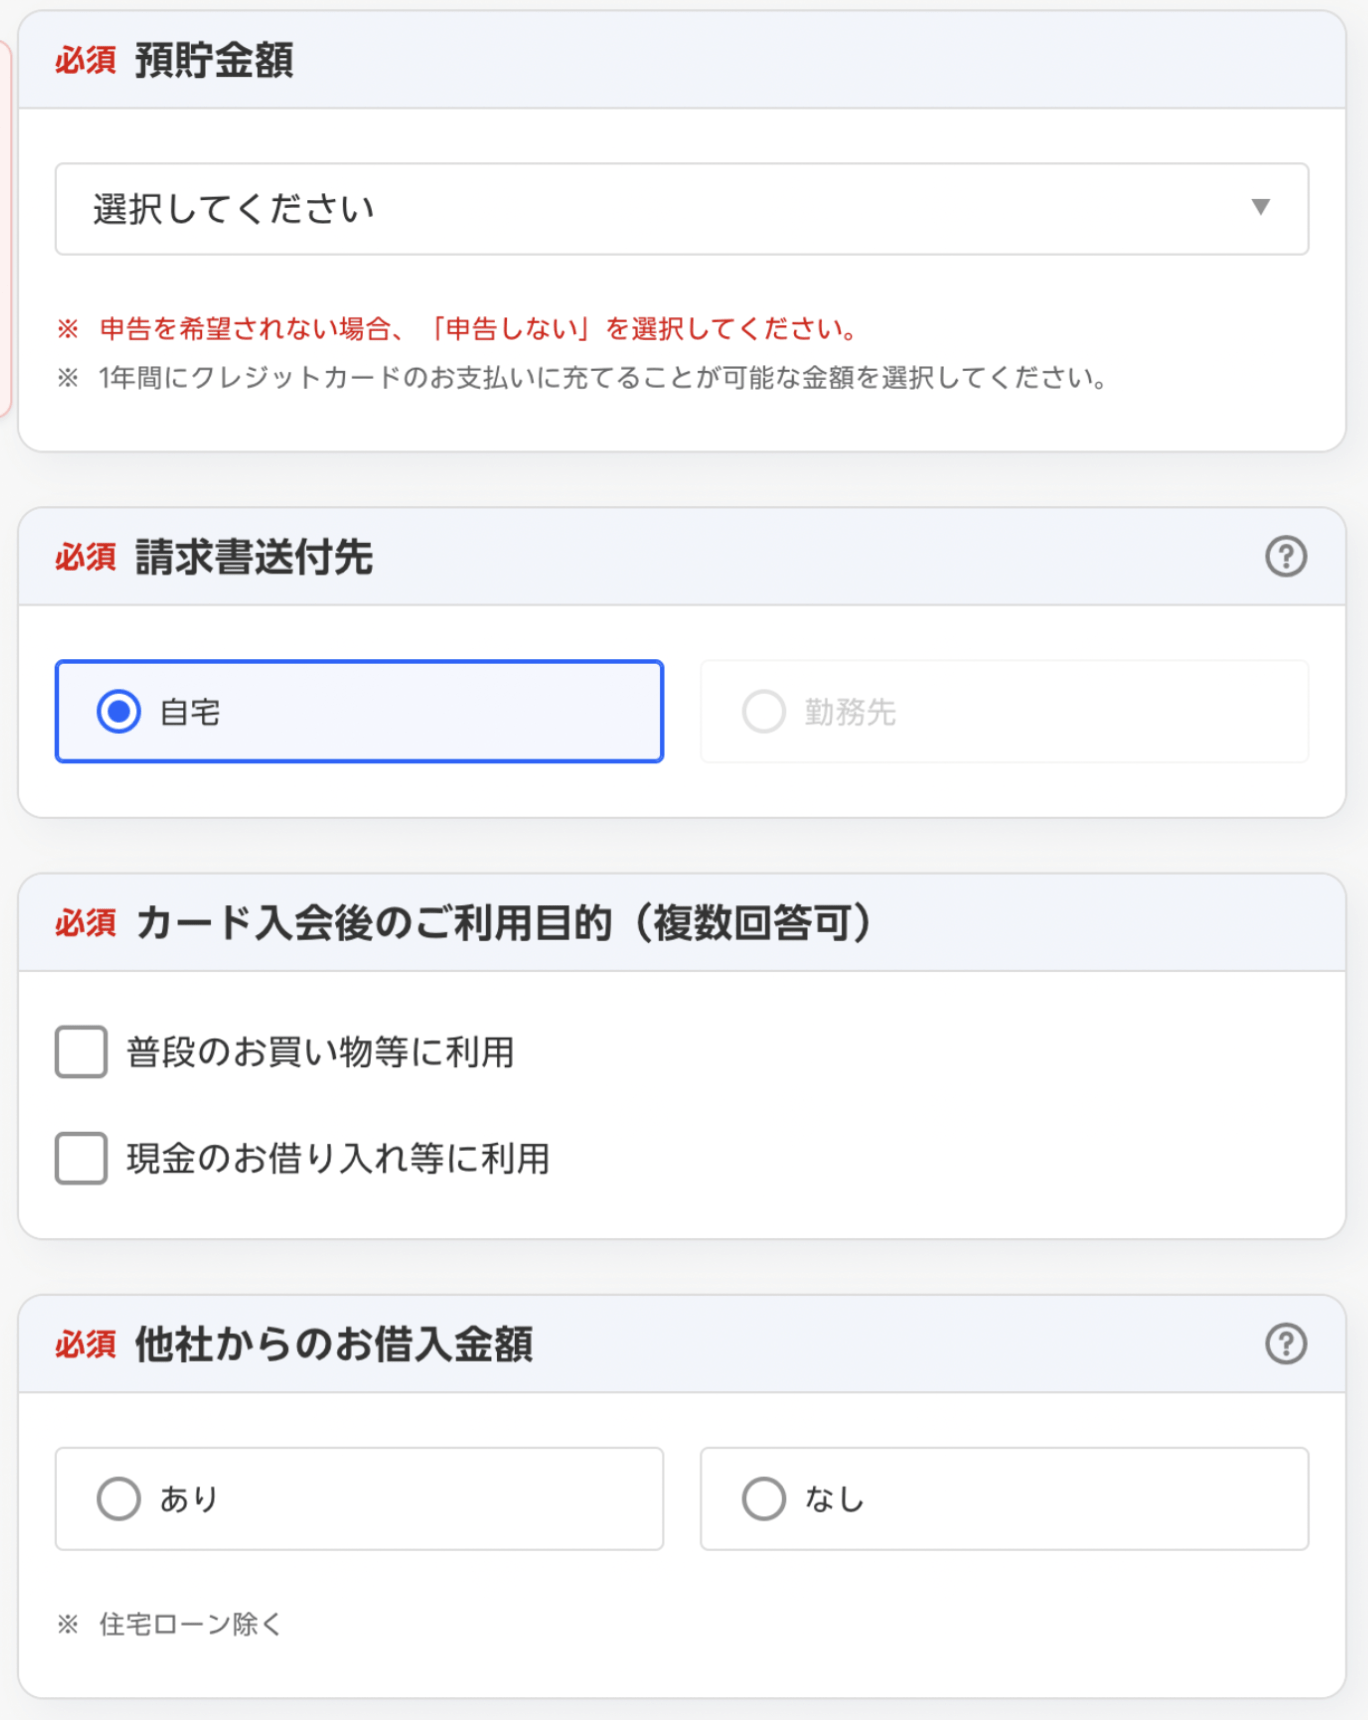
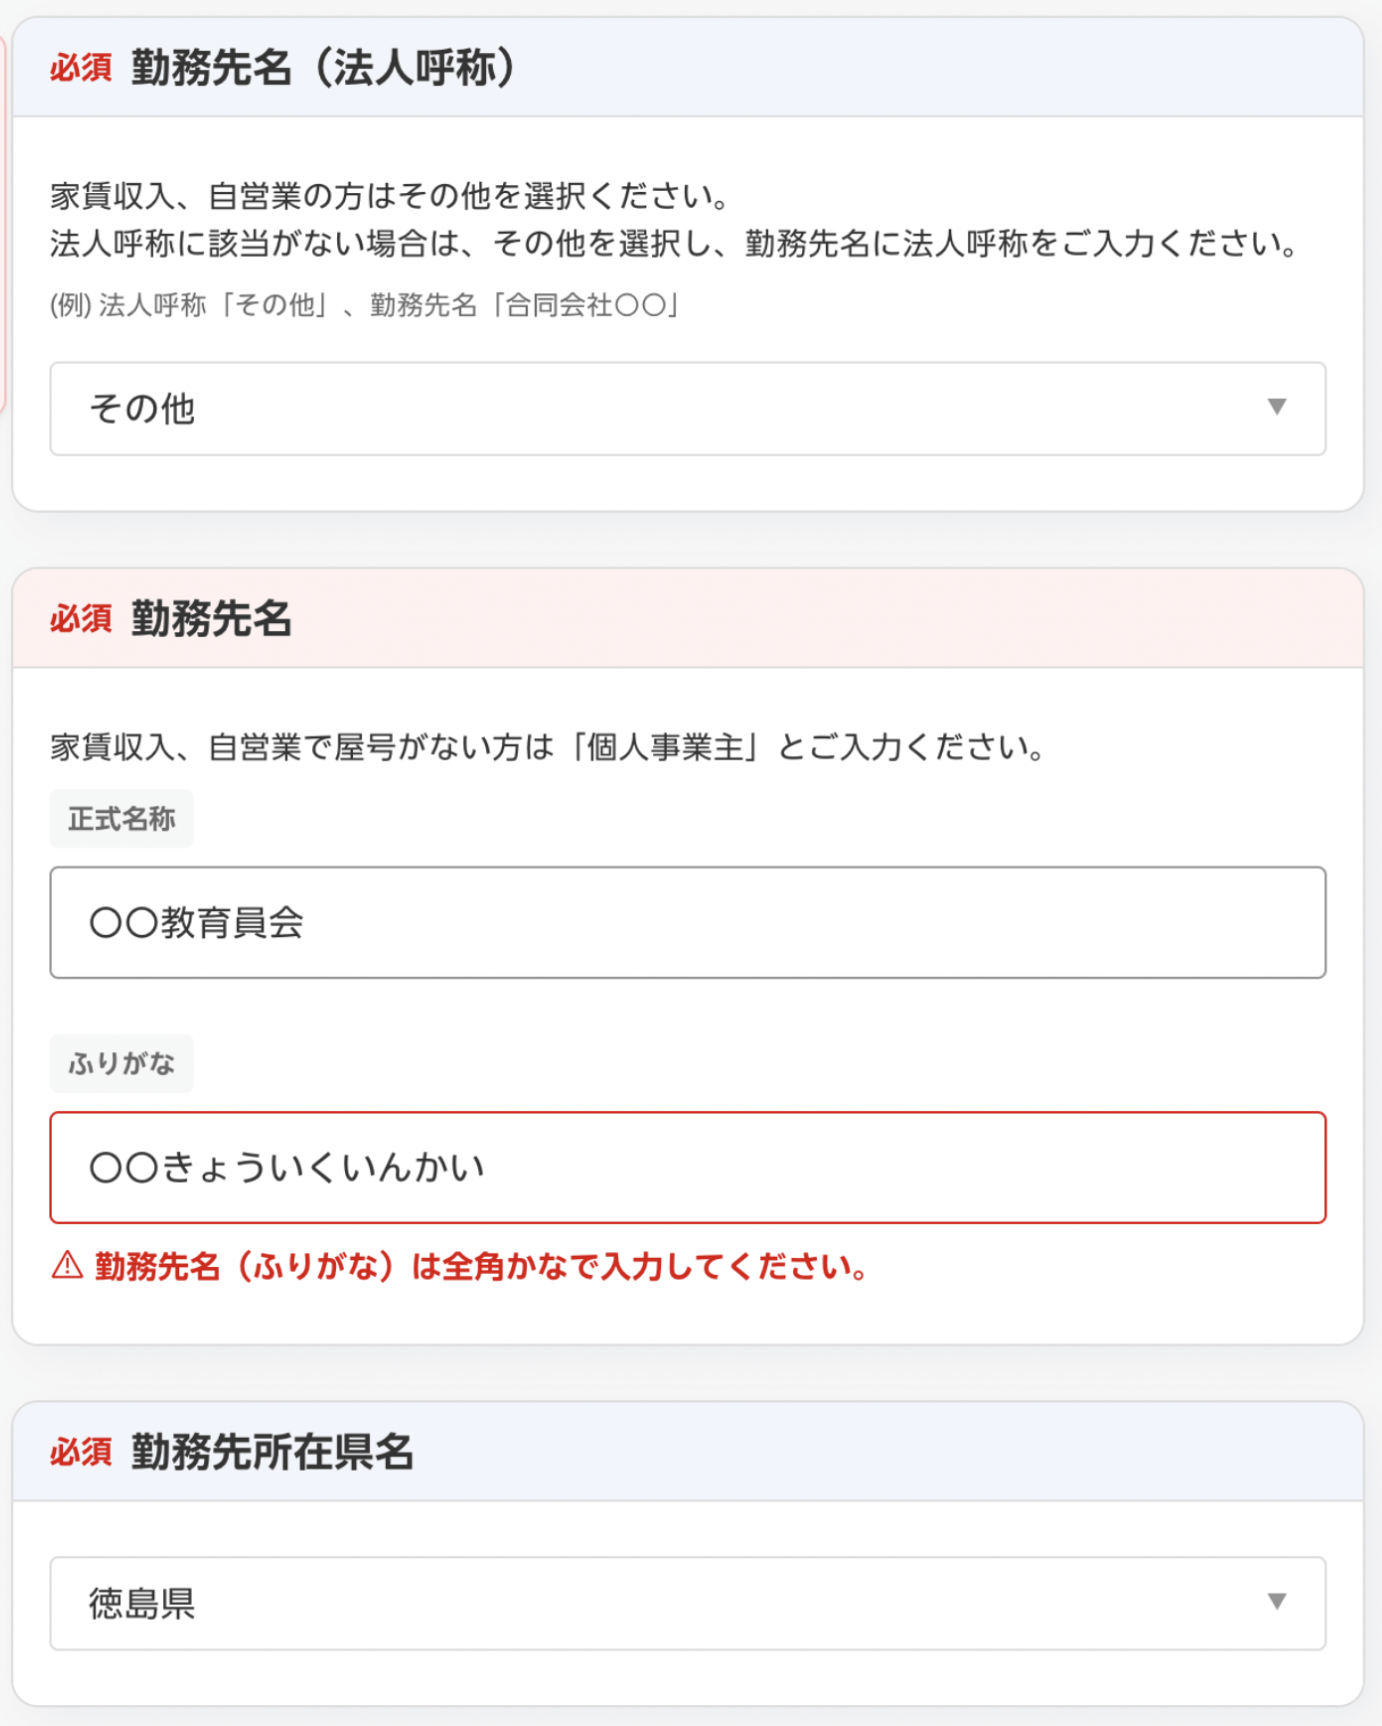
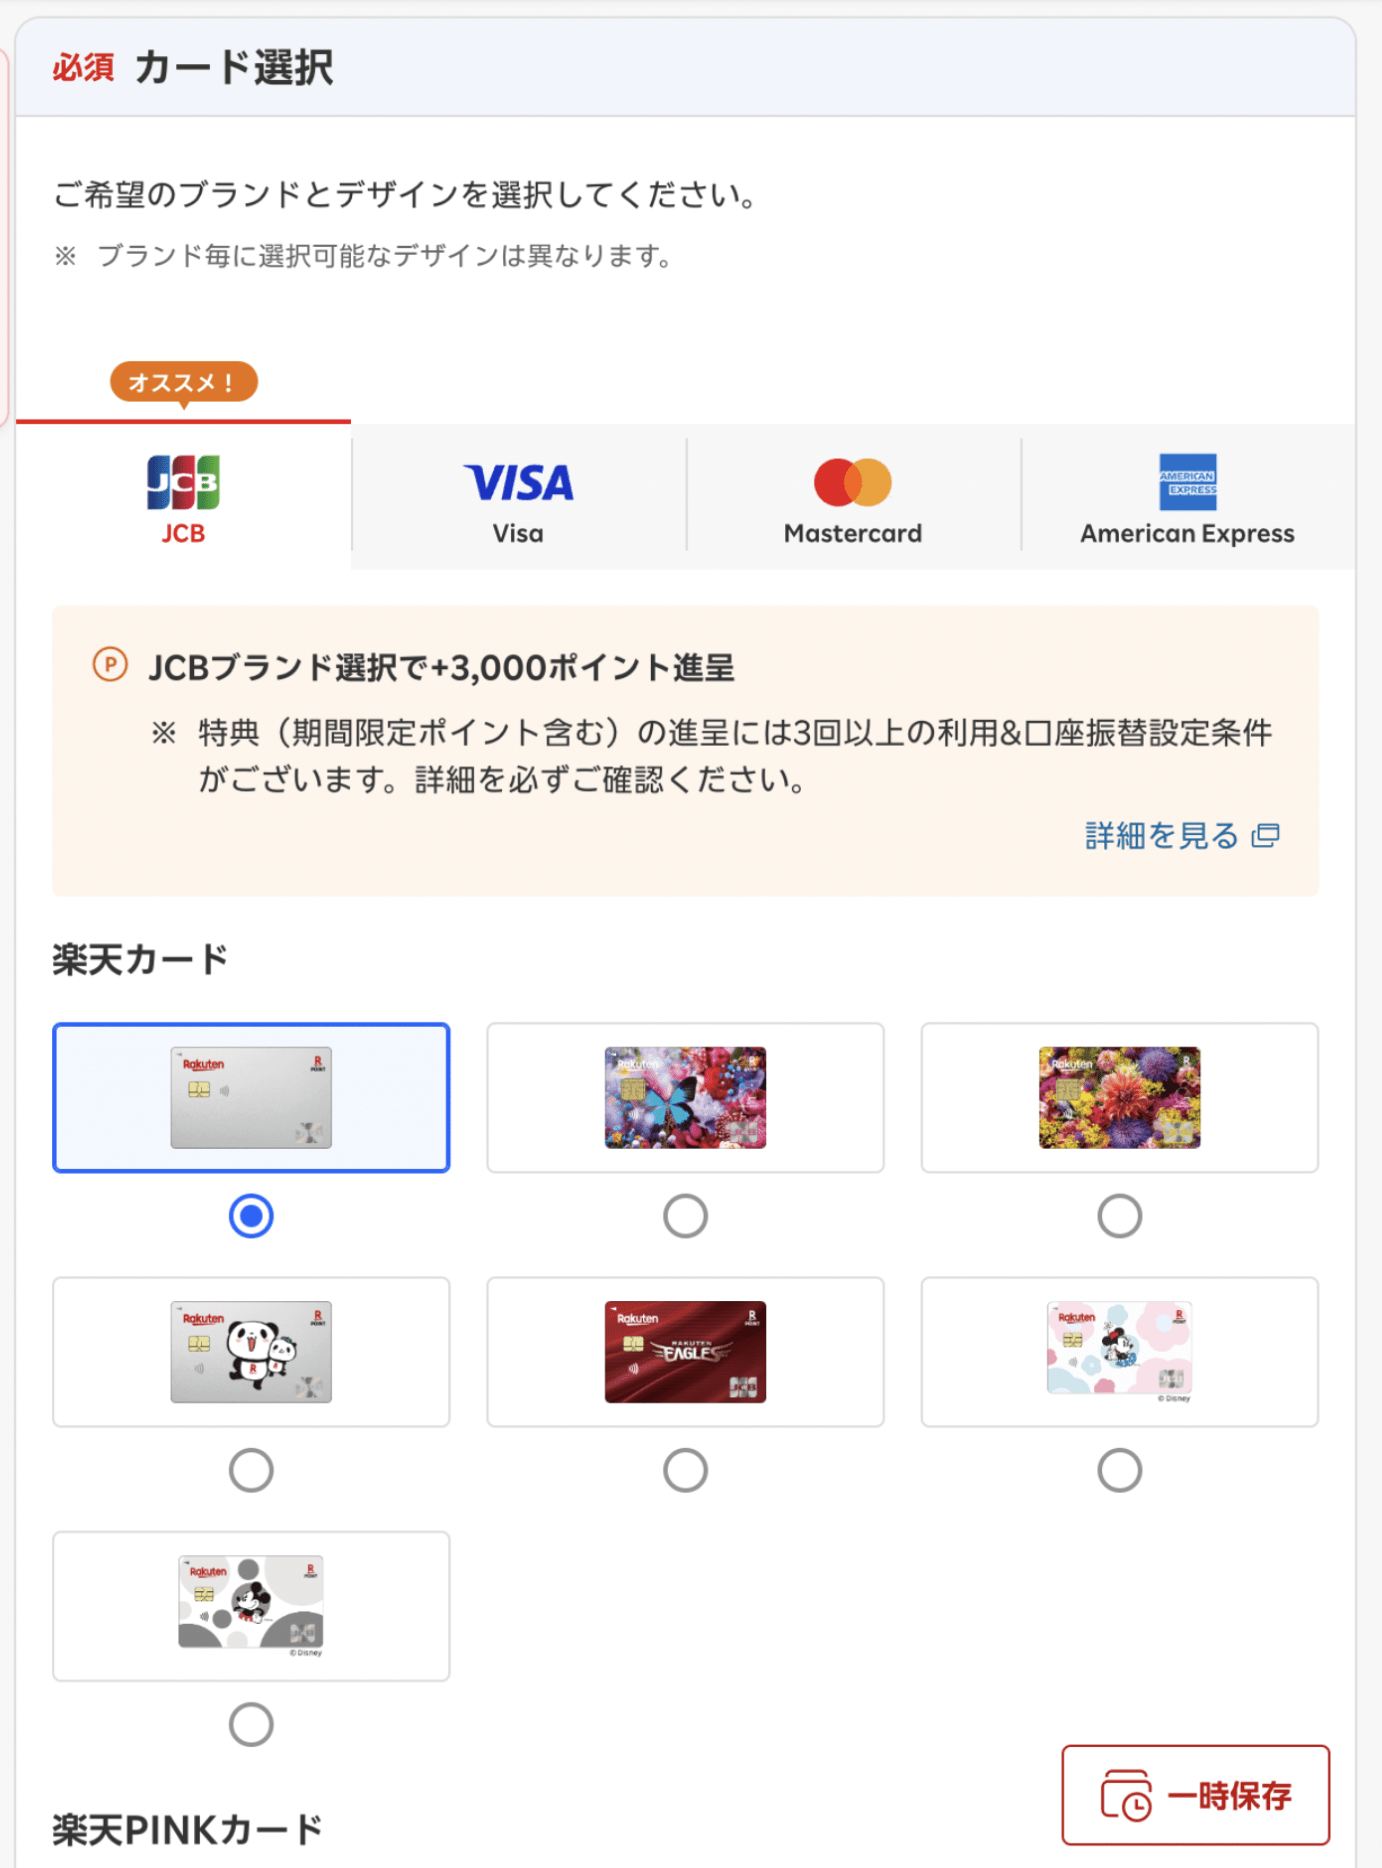
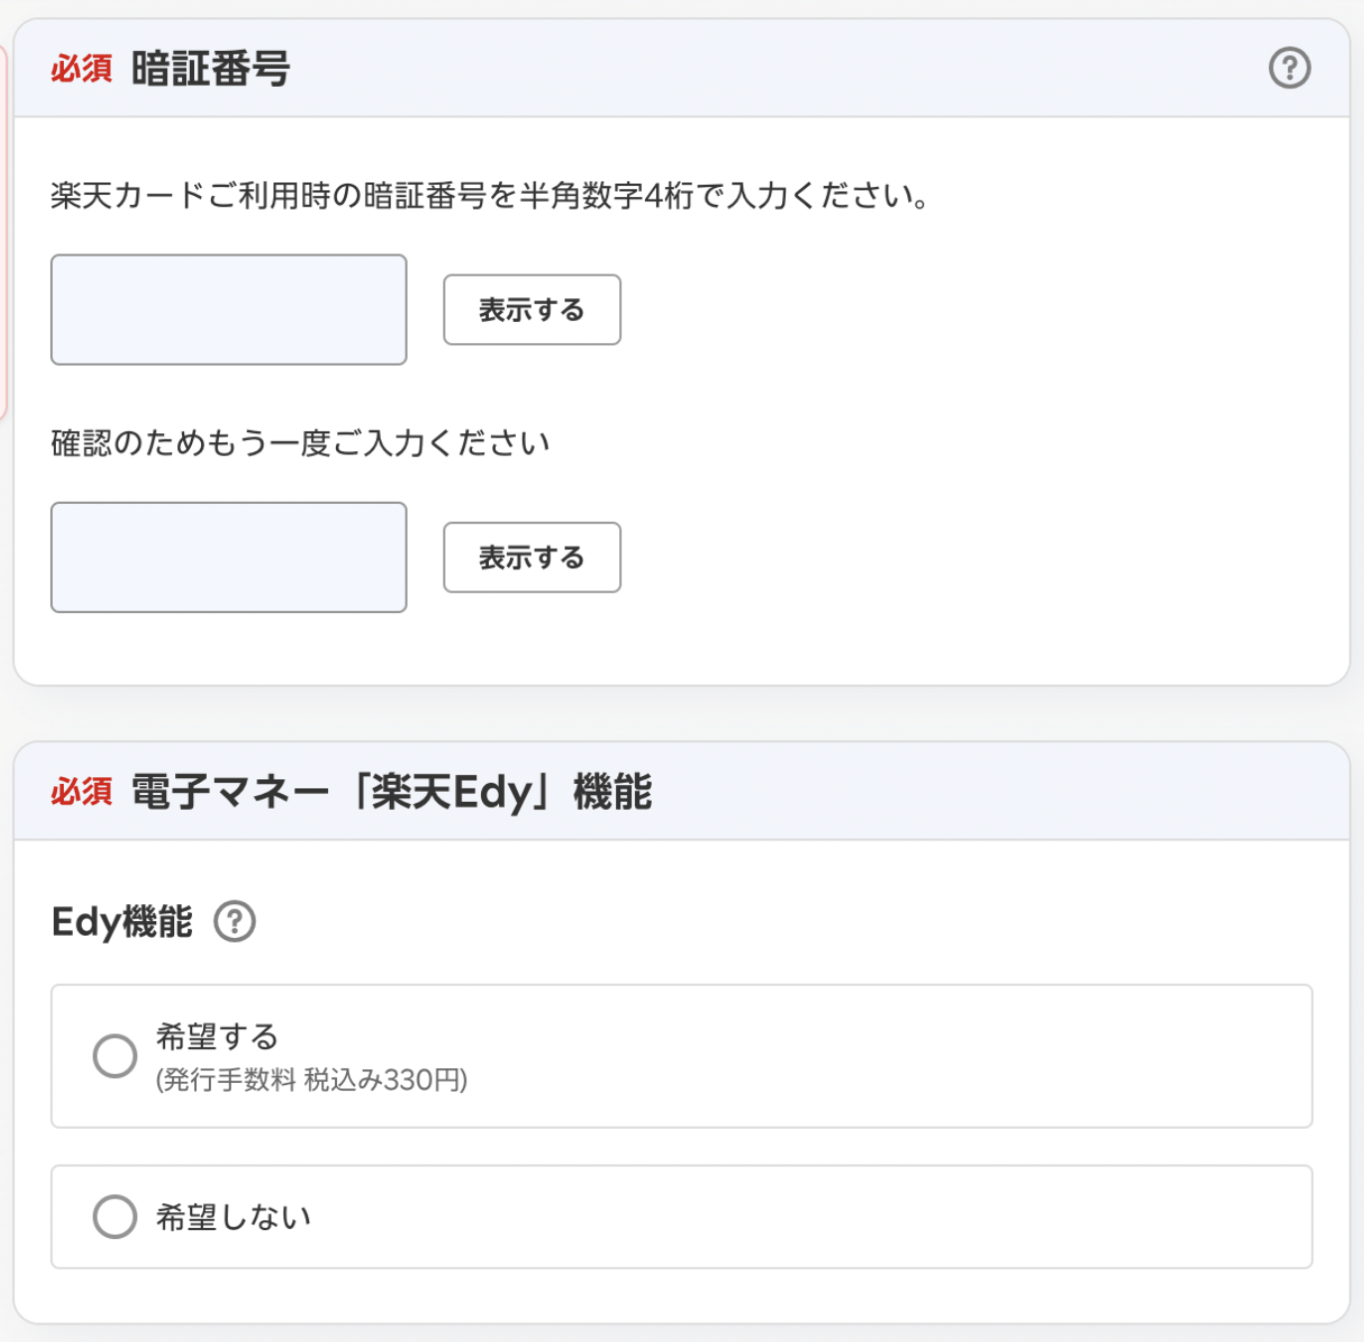
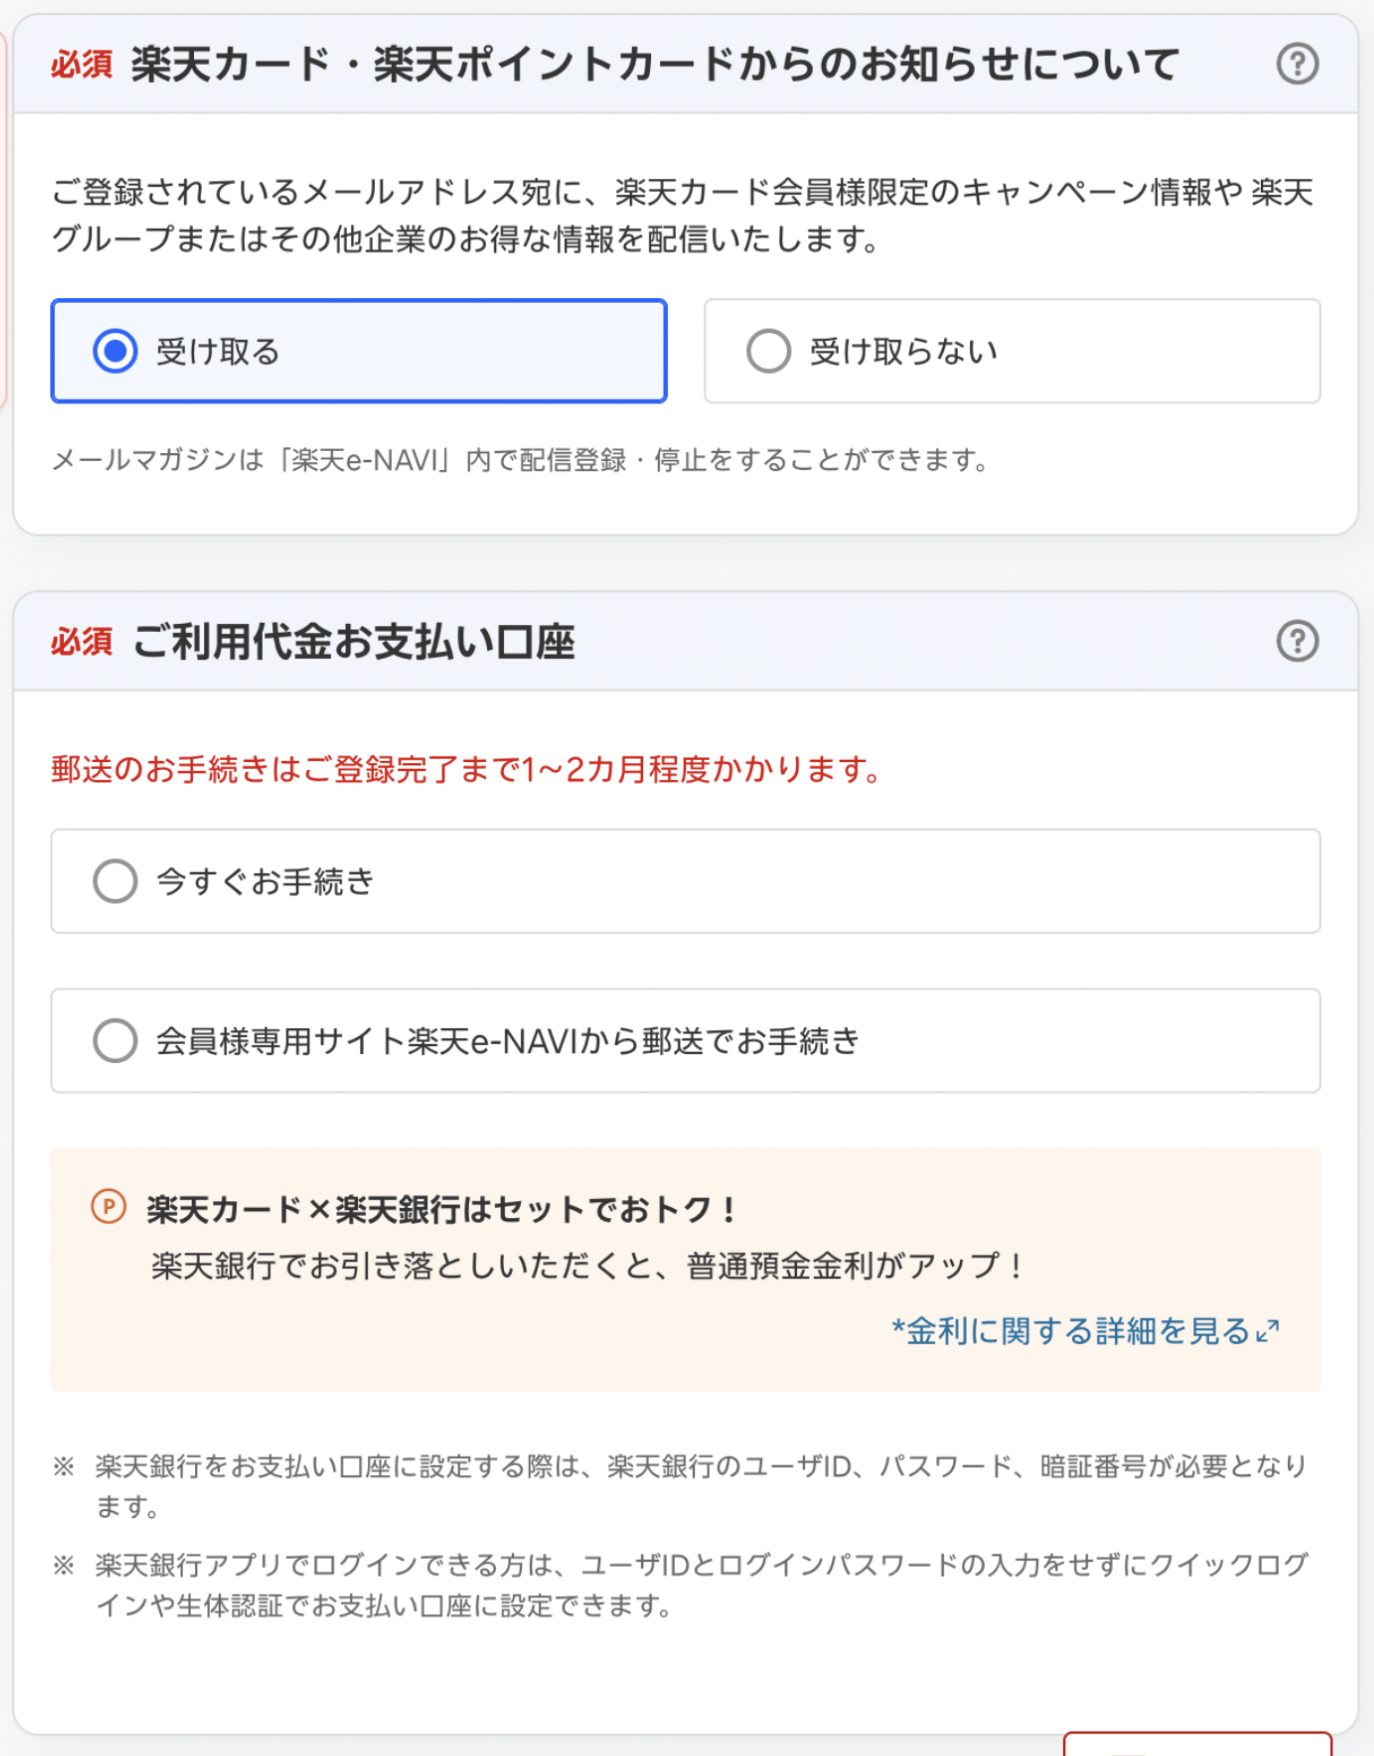
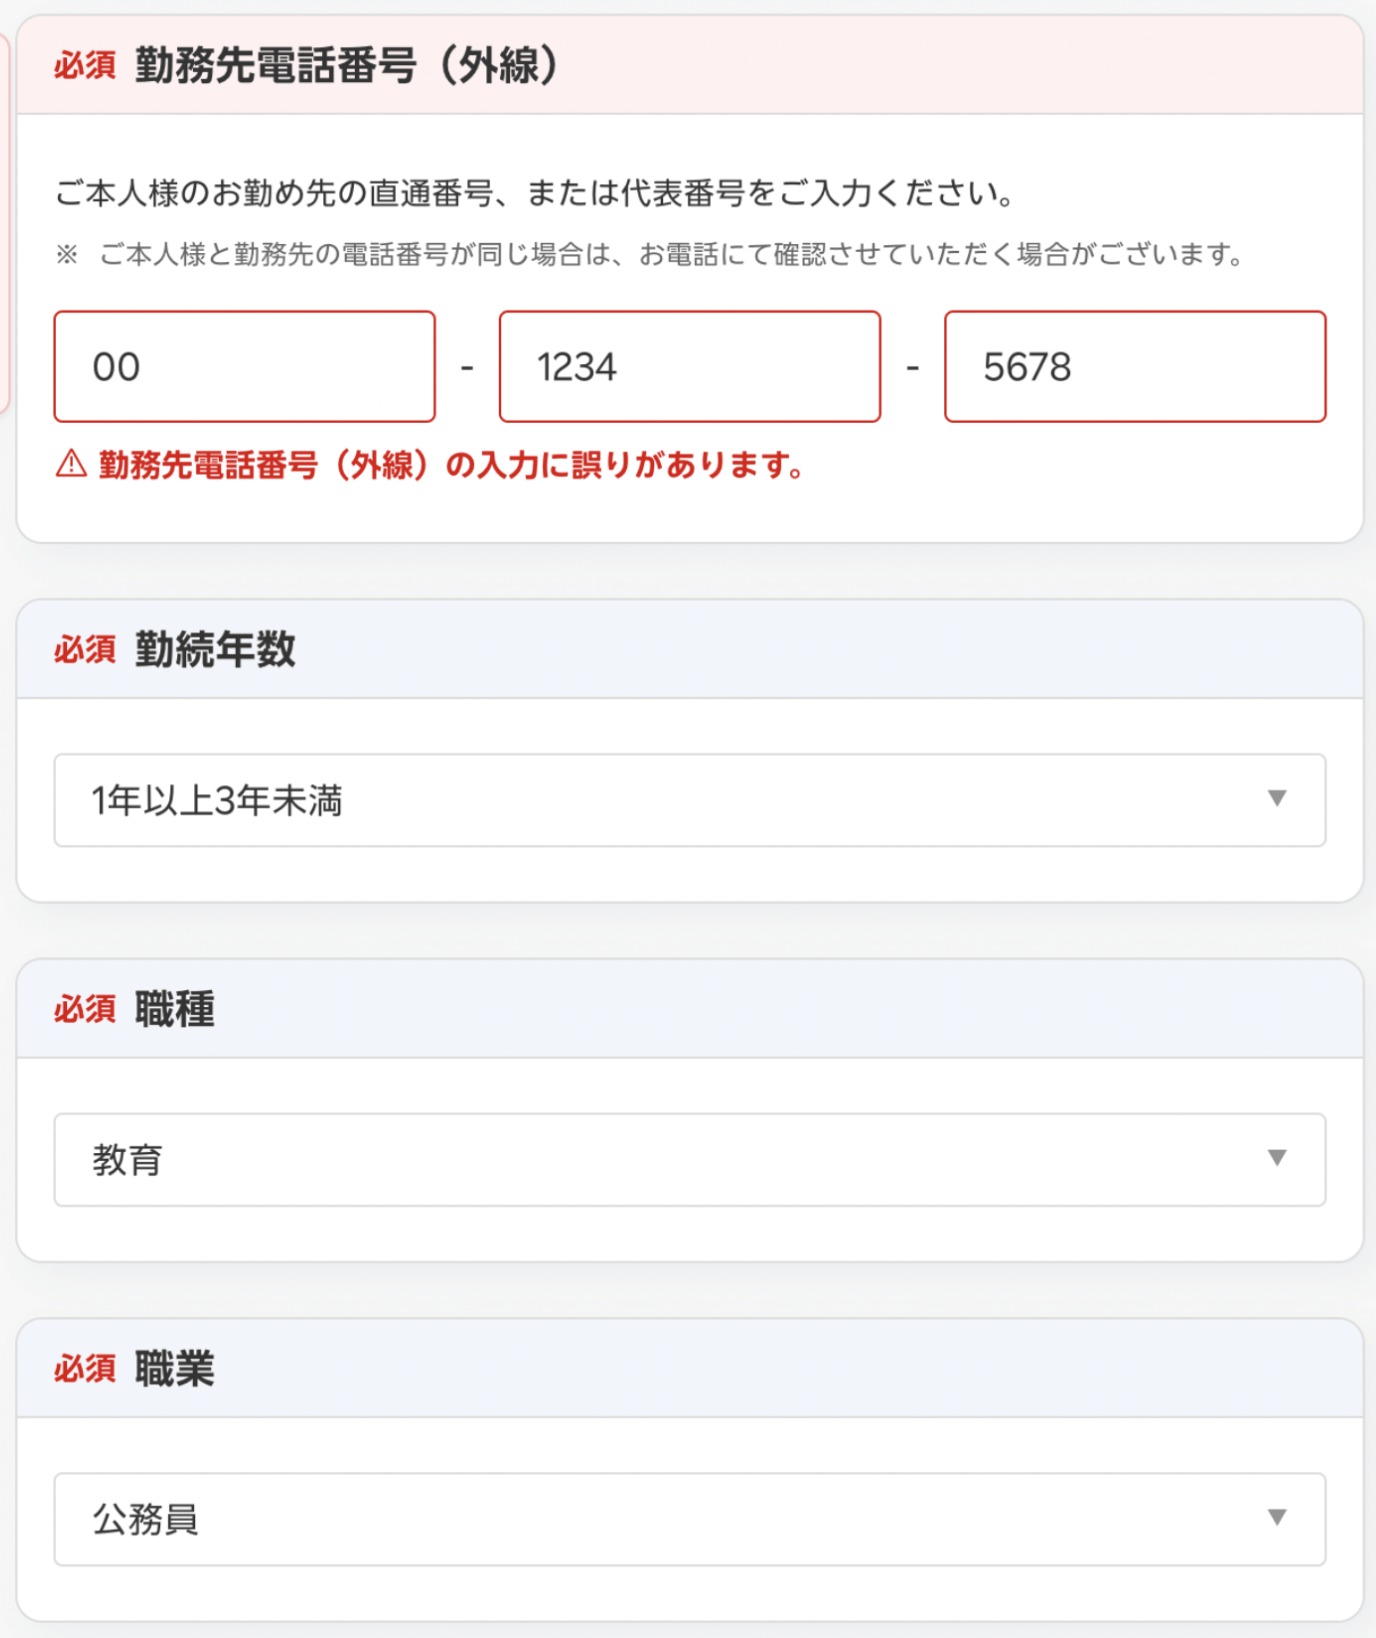
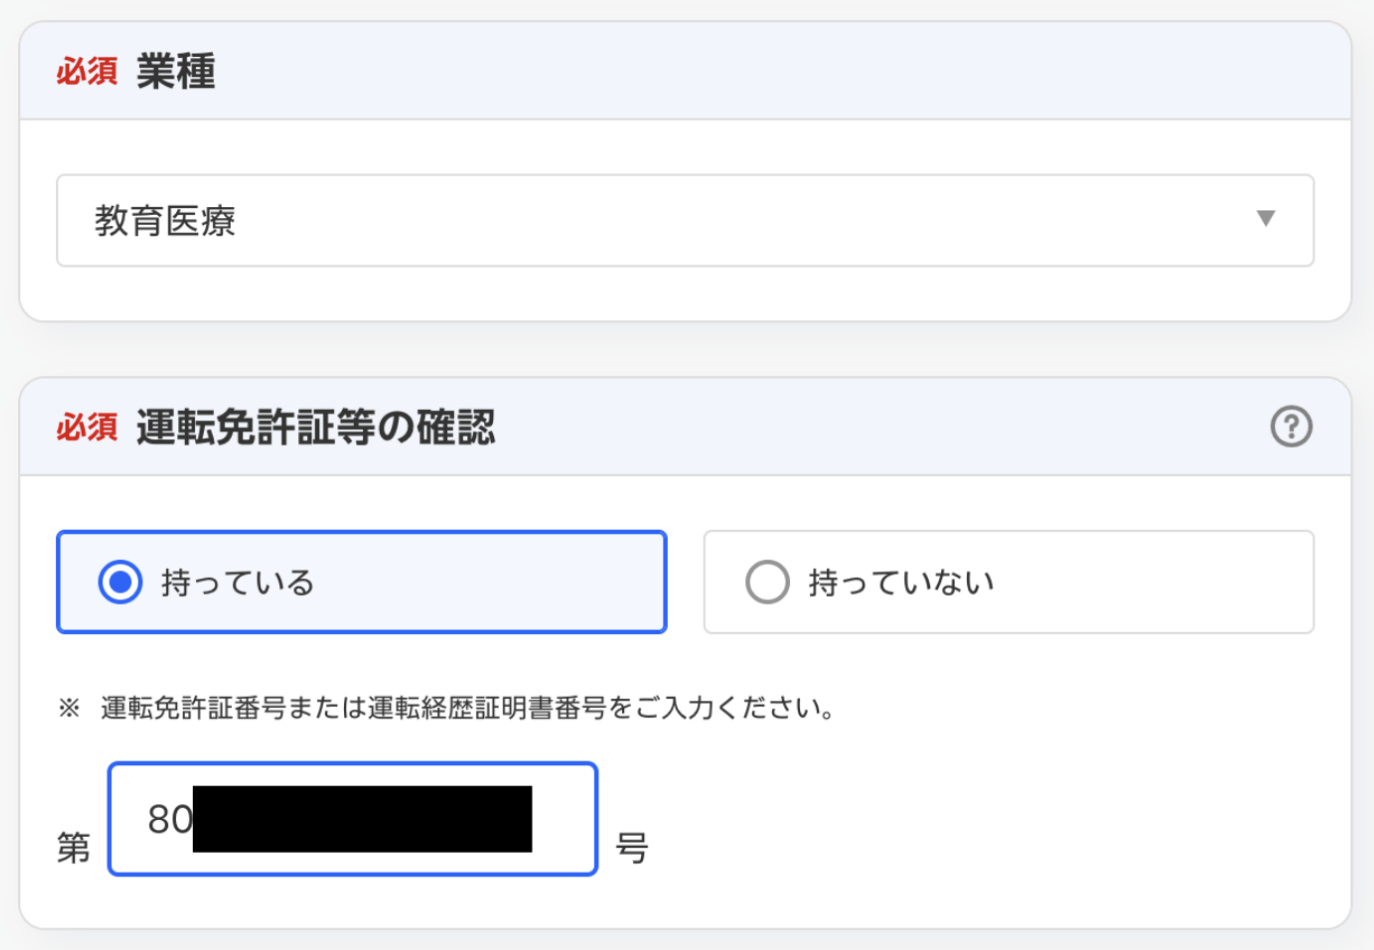
As you read through this application advice, please refer to the labeled images above. This guide is better viewed on desktop.
- Once you begin the application, it will start with your name. This is where your application will either go smoothly or not so smoothly. As you can see, my full name (as it is on my residence card) is over 14 characters, which is not enjoyed by the online application. I personally hate making phone calls and I figured it would be easier to correct my name than do the entire application process over the phone so I simply removed the last letter from my first (middle) name and proceeded with the application.
- Choose the gender that matches your residence card, left being man and right being woman. Then input your birthday, followed by your phone number.
- Your email should already be entered here, but if you somehow have a smartphone specific email, you can enter that email here too.
- Now you will enter your address. Enter your postal code then press the button to the right. It should automatically pull up your prefecture, city, and district, but if there are multiple in that area, it will ask you to select one. The entry box below the furigana area is where you enter your street number, and if you live in one, your apartment name and number.
- Then begin the standard credit card questions. The top one is if you are married or not, and then if you have children. If you have neither please select なし on the right. It will then add a third option asking if you live in the same house as your parents. If you do, select left; if not, select right. The next question below is how many people live in your specific house or unit. Most likely it’s just you, so select 一人世帯 from the dropdown. If there are more, please select either 2, 3, or the last option, four or more. Lastly, in this image, it asks your house type, so please choose accordingly here.
- The top box in this image asks how long you have lived at your current residence. Then it asks if you have a mortgage or a loan on your house. If you don’t, you can select 支払いなし.
- Then select your nationality in the next box. Once you do, it will ask what type of card you have for identification. You should select 在留 (zairyuu), then select the classification on the card and input your residence card number. The classification will likely be 教育 (instructor).
- Then input the expiry date of your zairyuu card, and designate whether or not your name is longer than 20 characters. This is different from Rakuten’s 14 character limit, so I continued forth with my plan to call them later to adjust my name after the fact.
- The next box is about your work. The options you can select are, from top to bottom: worker, student, pensioner, or unemployed. Then you will enter your salary and the range of your savings and checking account currently.
- Then is a multi-select box asking why you want the card. The top option is just for daily shopping, etc.;, the bottom option is for borrowing cash. Either is ok to select. The last asks you for any outstanding loads from companies. I presume here it is referring to other credit card companies, not so much about student loans. If you do have any, it may be wise to put that information here. It will ask for the total amount and how much the monthly payment is. If you have none, as usual, select the なし option.
- Next, it will ask about the company you work for. In this case, you will select その他 and enter your contracting organization name, which should just be whatever board of education you are employed by (徳島教育員会, for example). Then choose the prefecture the company is based in, which is likely Tokushima.
- Now you can select the type of card you want. JCB is a good option for anywhere in Japan really, but you can of course select the other three (VISA, Mastercard, or AMEX) if that benefits you in some way.
- Here you will input a pin you want to use with your card. I chose not to do Rakuten Edy so I can’t help with that process personally. You can read more about it if you hover over the question mark, though.
- Next, you can choose to have notices about Rakuten points sent to your email or not. The last box is for setting up your bank account. If your name fits and is correct on the application, go ahead and attach your bank account. If you need to change your name later over the phone, select the lower option and attach your bank account later. If your name doesn’t match up on the application, it won’t let you input it.
- Enter your company’s phone number, how long you have worked there, select teacher (教員) from the dropdown menu, and then select the option for ‘public officer’ (公務員).
- Select the teacher option for the top box. If you do have a driver’s license, you can enter it here. If not, select the option on the right.
The next two pages will then essentially confirm the information that you put in. Make sure it’s all correct and send it off!
I can’t show it through the guide, but after you complete the first part of the application, it should push you through to the ETC setup process. You should just need to confirm that you would like an ETC card.
If you need to call to adjust your name, do so right after submitting the application.
Furthermore, those who don’t have to adjust their name should call anyway. The reason for this is that Rakuten will likely send you a card as a signed letter with your name in katakana. This is a problem. You cannot sign to receive your card without having an official ID with your name, but the name on your ID is always in romaji.
You will need to call Rakuten before they mail your card to ask them to send the letter with your name in romaji instead. Otherwise, you may have to wait an additional two or three weeks to receive your credit card, like I did.
Lastly, if you didn’t connect your bank account or don’t want to, they will send you bills in the mail which you then pay at the conbini, so keep an eye out for those.
Once that’s done, all you need to do is wait for your card to come in the mail! Whilst that is happening, if you don’t already have one in your car, you will need an ETC reader. This is what is also different about ETC cards from EZ-Pass. With EZ-Pass, you stick to your windshield and it’s good to go. But with ETC, you need a special reader installed in your car. It’s generally installed in one of two places: either on the dashboard towards the front, or on the drivers side below the dash. If you don’t have one already installed, it’s rather simple. You can pick up any reader at an auto shop or purchase one off Amazon or Rakuten. Then you will need to go to your mechanic and have it installed.
After all that you should be good to go once you receive your ETC card, all you have to do is push it into the reader and go! If you rent or use different cars for travel but still want to use your ETC, as long as that car also has a card reader, you will be able to just slot your card in and use it.